iRacing Tire Management Guide: How to Keep Your Tires Fast
If your tyres are gone by lap six and everyone around you seems fine, the honest first suspicion is not the setup. It is that you are asking the tyres for things they cannot give, in places where it costs the most, and the numbers at the end of the stint are reporting the consequence rather than the cause.
That is what this page is about. Not what a tyre is, but which driving habits destroy one — how to recognise them from the seat, how to check whether you actually have the problem you think you have, and then the part most guides stop short of: what to do about it in the next corner, while the race is still happening. That second half comes from two live Academy workshops on tyre management, with the coach's drawings and the questions members asked while we worked through it.
One caution before any of it. iRacing does not have a single tyre. Tyre models are rolled out class by class, so how the car you raced last season behaves does not automatically carry over to the one you race this season, or to the car beside you on the grid. Nothing below is a number to memorise.
Tyre management is not driving slower
It is the opposite. What you are managing is your average lap time across the whole race, and a driver who manages tyres well finishes with a faster average than one who attacks every corner and pays for it from lap six onward. Every technique on this page is a way of going quicker over a stint, not a way of going slower to be safe.
Temperature and wear are two different problems
They get discussed as one thing and they behave nothing alike.
- Temperature is immediate and recoverable. Overheat the surface and grip drops now, then comes back when you stop abusing it.
- Wear is cumulative and permanent. Rubber you removed is gone, and a thinner tread also changes where the tyre's temperature settles.
The old rule of thumb — that in a sprint race you can ignore wear and only manage temperature — is not one I would hand you today. Some current iRacing tyres are deliberately built to come in slowly, peak, and then fall away over a run, and iRacing has said as much in its own release notes for the cars concerned. In those cars "the tyres are going off" is a designed part of a short race, not an excuse.
That said, in iRacing temperature is the problem you will meet first and most often. A member asked in the workshop whether heat cycling was what got you into trouble, the way it does in some other tyre models, and the honest answer for iRacing is that wear is rarely your biggest concern even in a longer race. It is nearly always the temperatures, and a tyre that has been cooked repeatedly will make your laps far slower long before the tread figure looks bad. How punishing that is varies car by car — some open-wheelers are notoriously hard to keep in the window, some GT classes are far more forgiving — but the mechanism is the same everywhere.
So do not carry a rule into the sim. Run the test instead:
The twenty-minute stint test
- One long run at race pace, race fuel, in the car and on the track you actually race.
- Watch your lap times across the whole run rather than hunting a personal best.
- Pace drops away, then recovers when you back off → you are temperature-limited. Manage slip.
- Pace drops away and stays down → the tyre is degrading. Manage the stint.
That takes one session and it is correct for your car today, which no general rule can promise.
The two things you are actually managing
Before any of the individual causes, it helps to know what a well-managed set of tyres looks like, because the picture is simpler than the list of ways to ruin it.
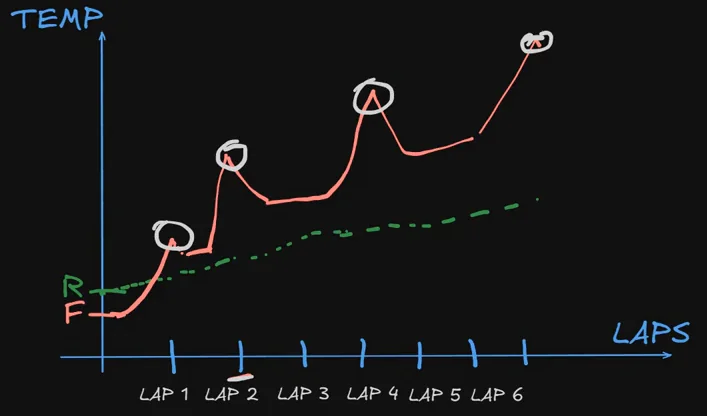
At the start of a race, in a GT3 or a formula car, the front and rear temperatures sit in roughly the same place. As the laps go by, both rise — that is expected, you are using the rubber. What separates a good stint from a bad one is two things, and only two:
- The fronts and the rears rise at the same rate. When one axle runs away from the other, the car becomes hard to drive and very hard to extract grip from, even if neither temperature is extreme on its own.
- Both stay inside the operating window. A tyre can track its partner perfectly and still be too hot to grip. The window is where the rubber gives you the most, and outside it you are slow whether the two axles agree or not.
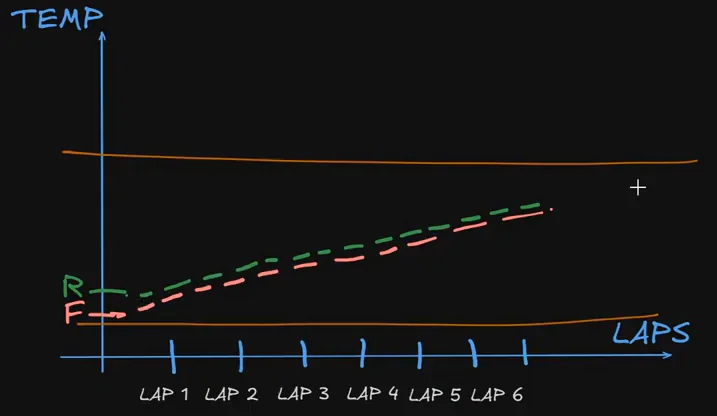
The failure usually looks like one line pulling away from the other. A driving style that lives in understeer — missing apexes, a lot of steering lock, the car not rotating — sends the front line climbing faster than the rear. A style that lives in oversteer does it the other way round. Either way the gap between the two lines is the first thing to worry about, and the window is the second.
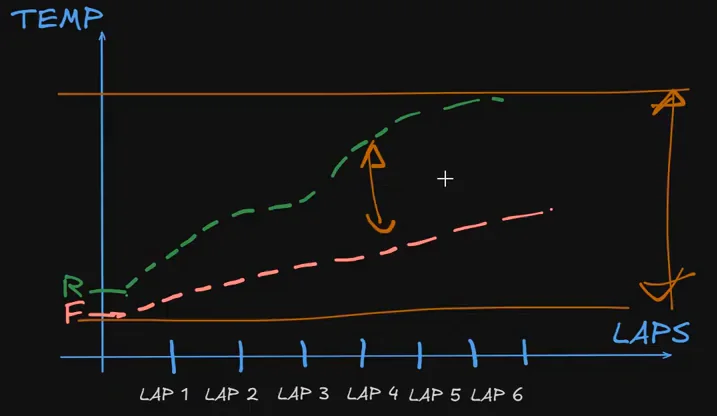
Everything below is about keeping those two lines together and inside the box. The per-axle causes come first, because you need to be able to name what you are doing before you can stop doing it. Then the part that matters in a race: how the corner you just drove decides how you drive the next one.
How to check tyre temperatures and wear in iRacing
The data lives in the Tire Info black box, on F6 by default. For each corner of the car you get three temperatures across the tread — inner, middle and outer — and three matching tread figures for the same bands. Twelve temperatures and twelve tread numbers, not one per corner.
Two things about that box catch people out, and both are worth getting right before you make decisions on it:
- It is not live. iRacing's own documentation says the information is updated only at pit stops, and that it shows the last set of tyres taken off the car. It is a pyrometer sheet for the stint you have finished, not a gauge for the tyres you are on. Nothing you do this lap moves those numbers.
- The tread figure is what is left, not what is gone. It reads as percent tread remaining, so 100% is a fresh tyre and the number falls as it wears. Read it the other way round and you will pit twenty laps early.
Use it between stints to judge camber and pressure from the run you just completed. For what the tyres are doing right now, the honest instruments are the car's behaviour and your own inputs — which is most of what follows.
What you can and cannot see from the seat
Members ask about this every time, so here is the state of it. A handful of cars show live tyre temperatures on their own dashboard, because the real car does; a few more show live pressures, which climb as the tyre warms and give you a rough proxy for it. Most show neither. And iRacing does not expose live tyre temperature through its data output, which is why no overlay can put a number on screen mid-lap no matter what it promises — the ones that appear to are reading the pit-stop snapshot.
So for most cars, most of the time, the tyre temperature you have is the one you can feel. That sounds like a limitation and it is, but it is also why the rest of this page spends so much time on understeer and oversteer: on the majority of the grid, they are the instrument.
Key bindings are remappable and iRacing has been rebuilding the in-sim UI since 2025 Season 4, so if F6 does not open it in your build, check your options rather than assuming it moved for everyone.
One session, or a coach every week
- Personalized feedback
- One coaching session
- Advice based on your driving
 GITGUD ACADEMY
A full month for less than one 1-to-1 session.
Why your front tyres are overheating
Two habits account for most of it, and they compound.
Front lockups
Even small ones. A front tyre that locks briefly is sliding rather than rolling, and sliding is what puts heat into the surface fast — plus, if it locks long enough, a flat spot you carry for the rest of the stint.
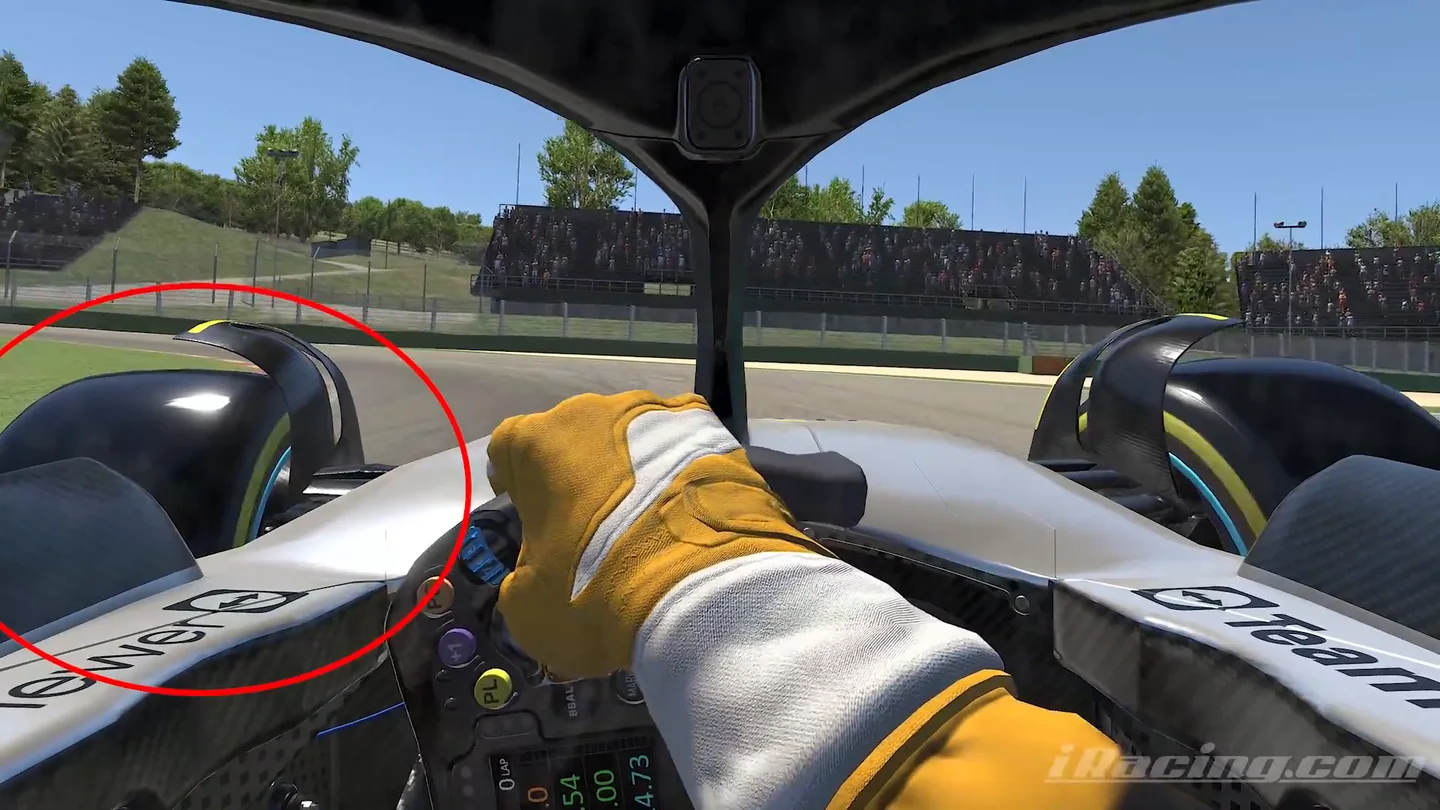
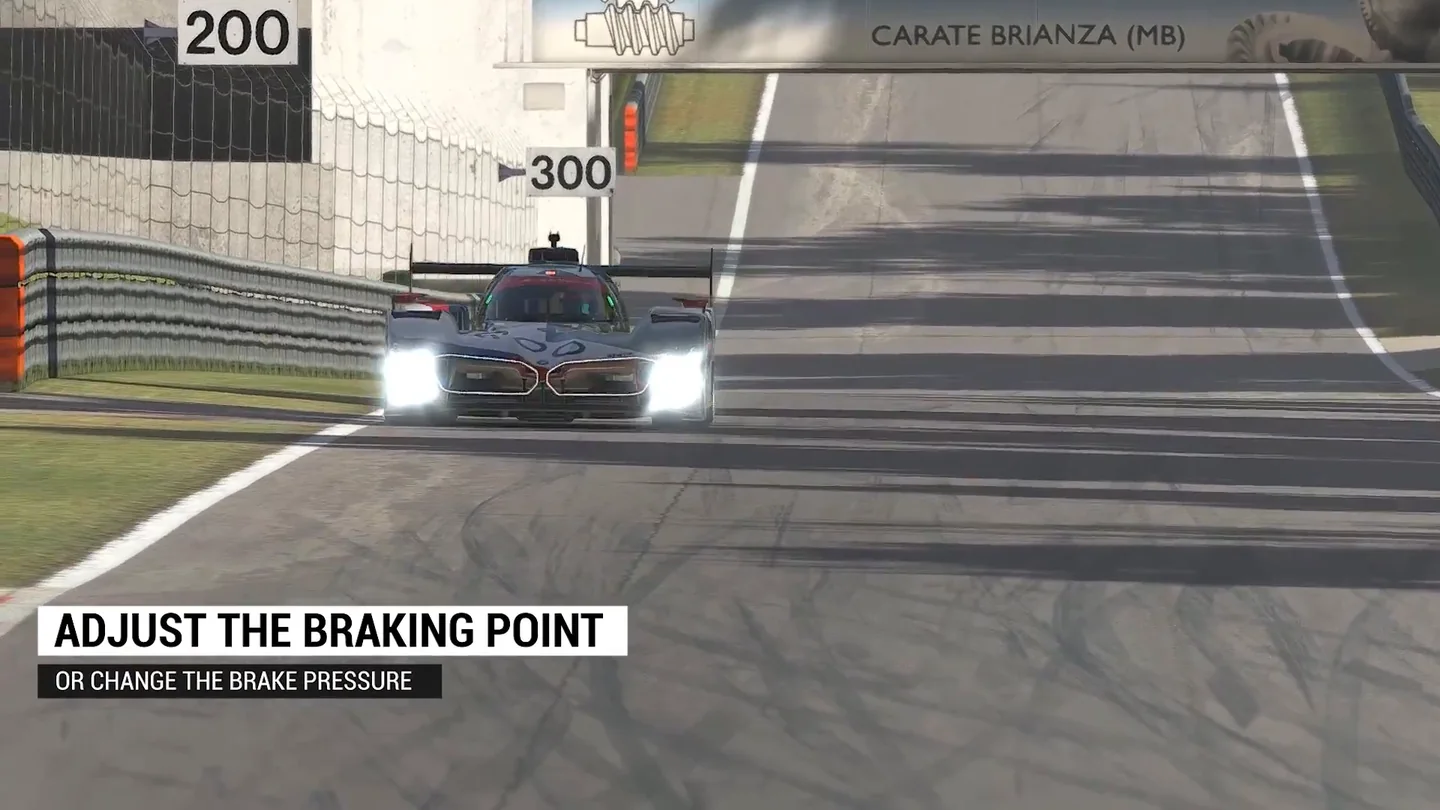
The usual cause is arriving with too much pressure for the grip available, either from braking later than the corner supports or from too much initial bite. Braking slightly earlier, or the same point with a little less peak pressure, usually removes it without costing you anything. If lockups are a pattern rather than an occasional error, five braking mistakes found in one lap is a diagnosis of exactly that, and if holding a steady low pressure is physically hard then it is the pedal rather than you — brake pedal tips covers that side. (Which is also why a later braking point has to be earned rather than grabbed; how to brake later is the sequence.)
Braking too hard in a straight line
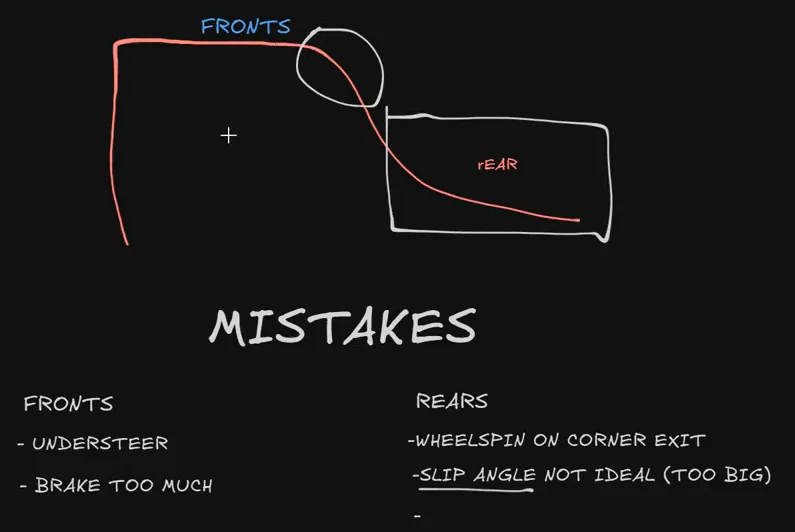
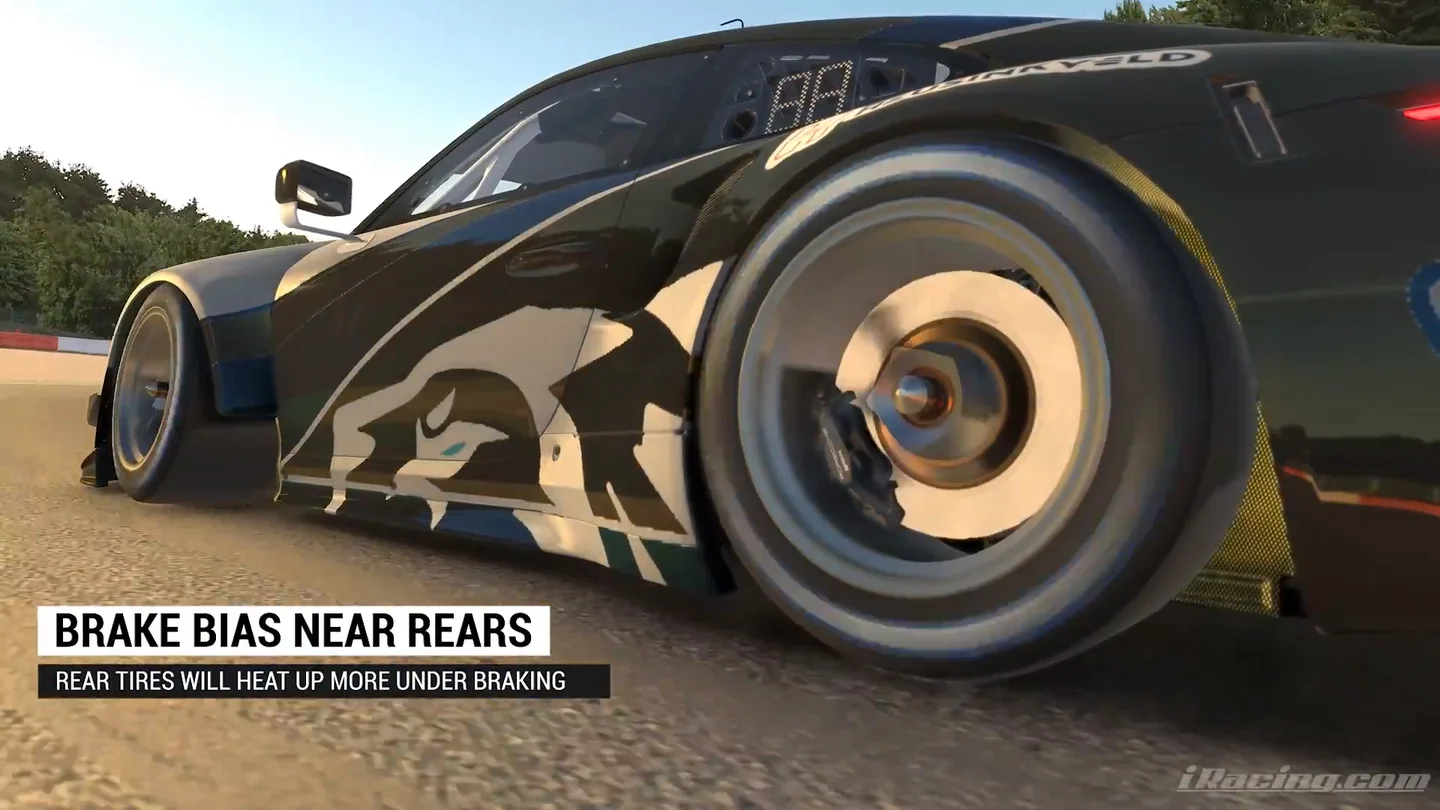
Lockups are the obvious version. The quieter version is simply braking harder than the corner needs at the top of the trace, and it costs the fronts even when nothing locks. The reason is brake bias: in every car you will drive it sits towards the front, so the fronts take the larger share of the braking force, and that share is at its largest in the first, hardest part of the brake when the wheel is still straight. Overdo the plateau of the trace and it is the front tyres that pay.
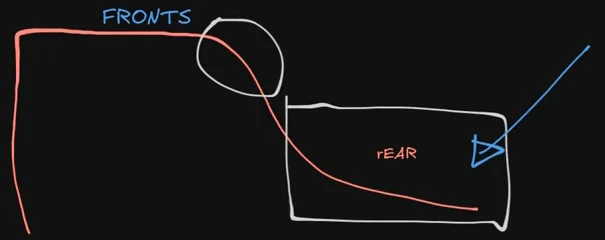
How do you know you are doing it? The workshop produced a list, from the most obvious cue to the most useful:
- Rubber on the track. Go to the replay, watch your braking zone from outside, and look for the tyre painting the tarmac for a sustained stretch. In iRacing you do not need to do that to stop the car, and if you are, you are past the limit.
- The pitch of the tyre. Tyre noise is instant feedback, and the difficult part is knowing which noise means what. Take a lap where you know from the data that you braked far too hard, and listen to it without watching. The pitch that goes with the mistake is a sound you can learn.
- The car leaning. The nose pitching forward more than usual, felt through the wheel or visible through the windscreen, is weight transfer telling you the stop was too abrupt.
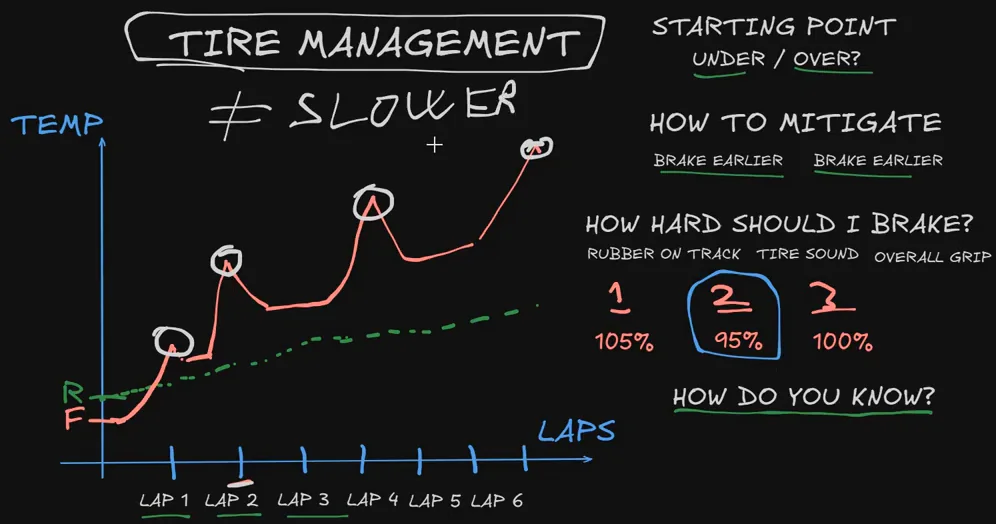
- Having to wait for the car. This is the one to internalise. If you spend, say, 105% of the available grip on corner entry, you cannot then have 100% in the middle of the corner. You will feel it as a moment where you have to wait for the car to settle before you can do anything else, and where any extra input — a little more trail brake, a little more lock — makes it snap. That waiting is the signature of having braked past the limit. The fastest way through the corner is to give up a little on entry so that the middle and the exit get the full budget.
Steering the car after it has stopped responding
This is the one worth internalising, because it is invisible from inside the car and it is free to fix.
When the front tyres are already at their limit, adding more steering lock does not make the car turn more. It adds slip angle past the point where the tyre makes its peak force — so you get no extra rotation, and you get heat and wear you did not need to pay for. The car understeers, you turn more, it understeers more.
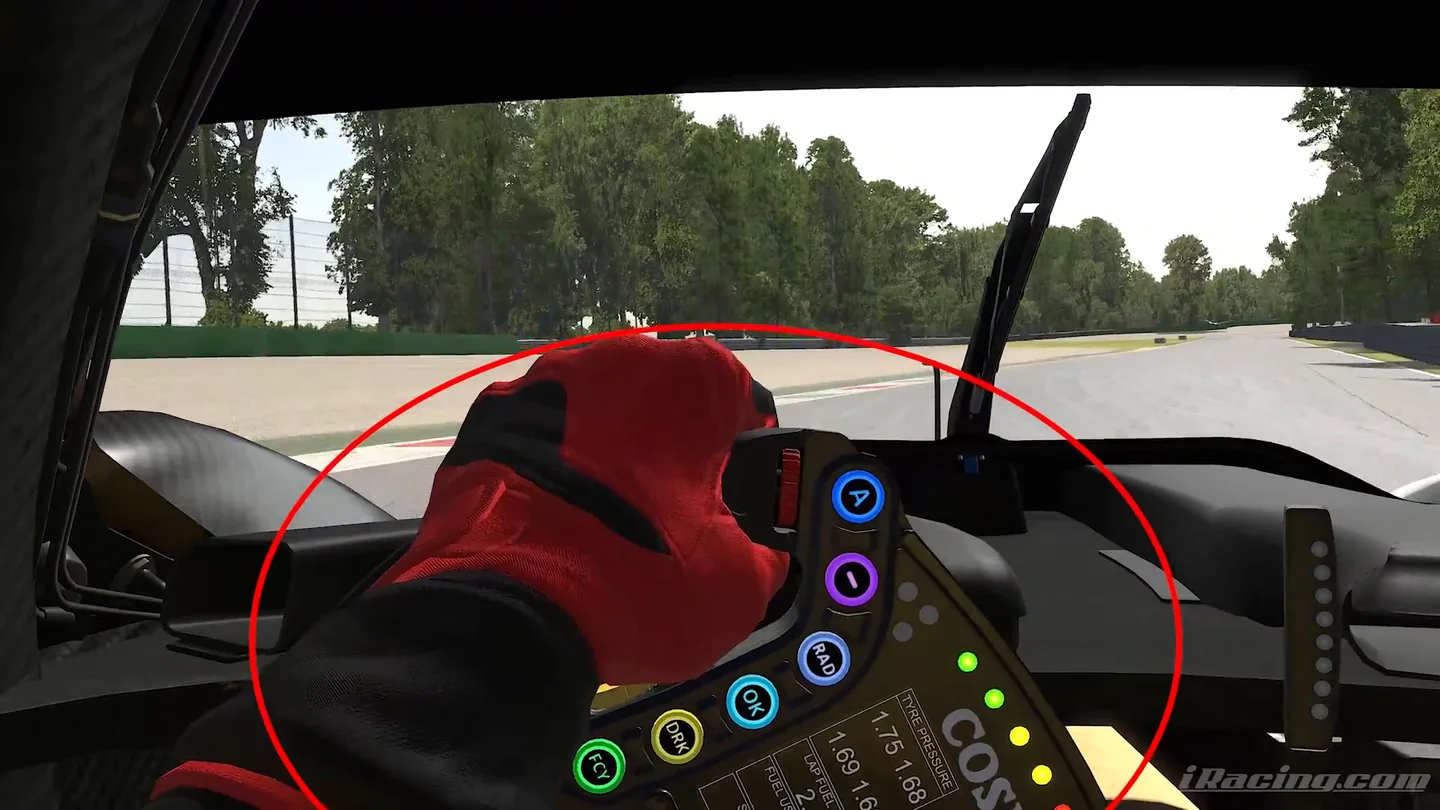
Saturation is the word for what has happened there, and it has a page of its own: why a tyre needs a little slip to grip at all, and what changes past its peak. This page is about what repeating it does to the tyres over a stint.
The check is simple and it does not involve a number:
If adding steering is not producing more rotation, stop adding steering.
You will see a specific degree figure quoted for this — the video this page came from uses ninety degrees. I would not use it. Steering ratios and lock ranges differ enormously between a formula car, a GT3 and a road car, so a degree count that means "too much" in one is normal in another. The behaviour is the test, not the angle.
The correction is to fix the understeer with the pedals rather than the hands: get the slowing done earlier so the front has capacity when you ask it to turn. Brake earlier and softer, and if that alone does not do it, brake earlier and softer and be gentler with the first movement of the wheel, because the combination of braking and steering is what pushes a front past its limit even when each input on its own would have been fine. If you want the mechanism, weight transfer covers why a saturated front tyre cannot cash in extra load.
Why your rear tyres are overheating
Wheelspin on exit is the obvious one and the most common. Every moment the rear tyres are spinning faster than the car is travelling, you are converting grip into heat instead of acceleration. An occasional slip is nothing. The same slip on every exit for twenty laps is a stint. In a GT3 the traction control catches some of that for you, at a cost the tyre still pays — the GT3 sim racing guide covers how much to lean on it.
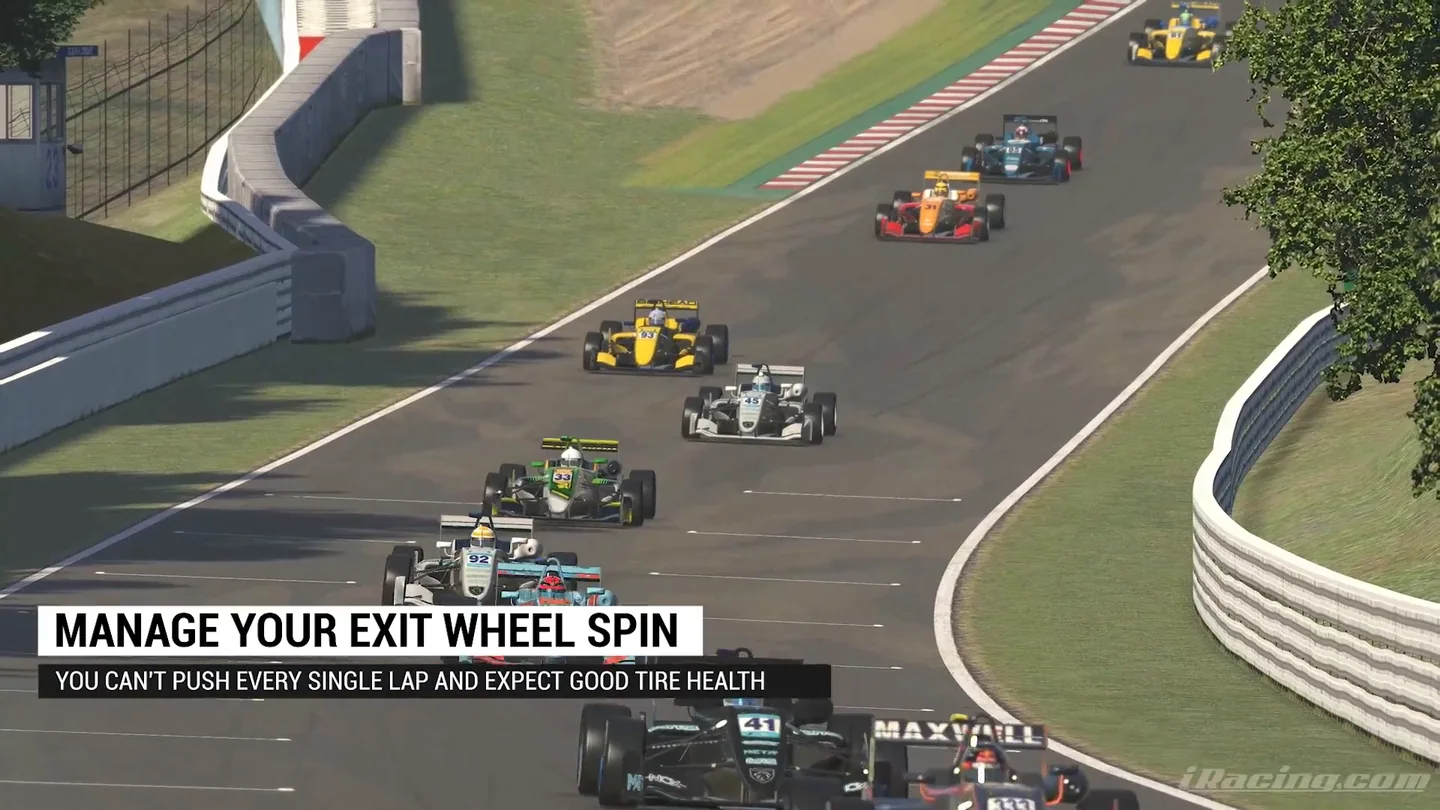
A member asked whether traction control changes that, and it does not, or not in the direction people hope. With TC on, the system is catching wheelspin that is still happening, and every intervention is heat the tyre has already been given. So in a GT3 the goal is to keep the involvement small, and the flashing lights are a cue you were over the limit on that exit, not permission. Which exits are worth a flash anyway is a genuine question, and it gets its own section further down, because the answer is about what comes after the corner rather than the corner itself.
Sliding the rear more than the corner needs is the other. Worth separating from rotation, because they get conflated: a car that rotates well is pointing at the exit early, not spending the corner sideways. A little slip angle is what rotation is, and GT and formula cars both want less of it than looks fast from the chase camera. A car that is visibly drifting through a corner is past that point, and it is heating its rear tyres to do something slower than a clean rotation would have done. Getting the car to rotate earlier is what reduces the need for the slide in the first place.
Holding the trail brake too long is the rear-tyre version of the straight-line mistake above. The plateau of the brake trace works the fronts; the tail of it, the low-pressure part you hold into the corner, is where the car rotates, and rotation is rear slip. Hold a few percent more than the corner needs, or hold it a little too long, and you get more rotation than you asked for and a rear axle that is warmer than the front. Most of the time that shows as oversteer on the way in. (There is a more complicated case where too much trail brake produces understeer instead, but it is rarer and it does not change the fix, which is to hold less.)
Brake bias too far rearward can also make the rears unstable under braking. Worth being precise about why, because the obvious explanation is backwards: braking transfers vertical load off the rear axle, so the rears are losing grip at exactly the moment a rearward bias asks them for more braking torque. That mismatch is what lets go. Whether it is actually your problem depends heavily on the car — so treat it as something to test, one change at a time, rather than a prescription. Finding the setting that stops just short of it is a method rather than a number.
Which of these costs the most? I am not going to rank them
You will find rankings — oversteer worst, then wheelspin, then heat under braking. I used to give one myself. I do not think it survives scrutiny, and I would rather say so than repeat it.
The reason is that the tyre does not know where the sliding came from. A rear stepping out, wheelspin on exit, a front washing wide, a wheel locking into a corner: at the contact patch they are the same event, energy that should have moved the car being dumped into heat and abrasion instead. What any one of them actually costs depends on how fast you were going, how much load was on that tyre, and which car you are in — the same slide angle in a fast corner scrubs far more rubber than in a hairpin, because far more energy is passing through the contact patch. iRacing also tunes wear car by car.
One thing I will say about frequency, which is a different question from cost: in the drivers I coach, the front tyres spiking is far more common than the rears. Not because it hurts more, but because entry mistakes are the ones people make most, and entry mistakes land on the fronts. If you do not know which end you are cooking, start by suspecting the fronts.
The useful version: work out which of these you do most often in the corners where you carry the most speed, and fix that one first. Your own temperatures and tread numbers at the end of a stint will tell you more than any general ordering.
The loop that makes a bad stint worse
Overheating and sliding do reinforce each other, and it is worth understanding because it explains the "my tyres died out of nowhere on lap six" experience.
A tyre makes heat two ways. Flexing the carcass builds heat slowly in the core, over laps. Sliding makes heat at the surface, and that term scales with how fast the tyre is sliding — so the more it slides, the faster the surface heats. Every compound has a window where grip peaks; above it, grip tapers off. Once a tyre is already above its window, grip drops, and if you answer that by asking for more — more lock at the front, more throttle at the rear — you add slip, slip adds heat, and heat costs you more grip.
Three things that loop is not, though, and they matter more than the loop itself:
- It is not a runaway. Surface temperature is the fastest-moving temperature on the car — made by slip, and shed quickly into the air and the road. Ease off and it comes back down within a corner or a straight. What does not come back quickly is core temperature, and genuine surface damage once the rubber has grained.
- It does not only run downward. Below the working window the identical mechanism is on your side: slip makes heat, heat brings the tyre up into its window, grip improves. That is why warm-up works at all. Slip is not the enemy — slip on an already-overheated tyre is.
- The step that closes it is yours. The loop needs a driver who keeps adding input to stay closed. Unwind, slow your hands, and it opens. That is the whole reason it is worth knowing about.
One more honesty note: not all the grip you lose across a stint is thermal. Tread wear costs grip on its own, so a tyre late in a run can fall away without ever having been overheated.
Managing tyres corner by corner
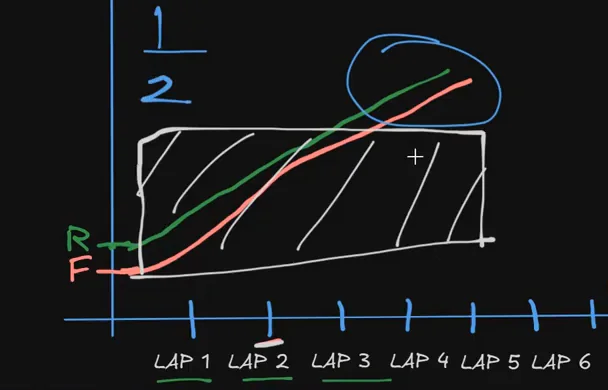
Everything above is drawn lap by lap, because that is the scale the data shows you. In the car the loop runs faster than that. Take the same graph and relabel the axis: instead of lap one, lap two, lap three, read it as turn one, turn two, turn three. Now it describes something that happens inside a single lap, and it is the most common way a good driver ends up with a bad stint.
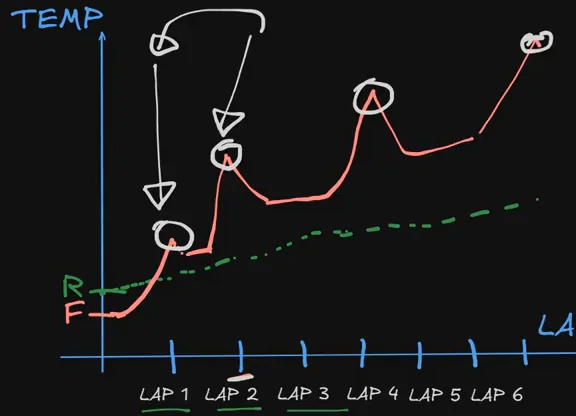
Say you have a big oversteer moment in turn one. The rears spike; the fronts do not. If you arrive at turn two and drive it exactly as you normally would, the tyres are not there for you. You are asking for your usual grip from a rear axle that has less of it, so you slide again, and now it has less still. Two corners later you have a pattern, and the pattern is what cooks a set of tyres that a decent driver should have kept alive.
The rule that breaks the pattern is short enough to say to yourself in the car:
Was the previous corner clean? If yes, push. If not, go softer in this one — and go softer in proportion to how big the mistake was.
A slight moment in turn one means turn two gets a blink-of-an-eye earlier brake and a fraction less pressure. A big slide in turn one means turn two is taken genuinely more cautiously. It is not an exact proportion — nothing here can be measured in the moment — but it is close to one, and knowing that it exists is most of the battle. Most drivers treat every corner in isolation, as though the car arrived at it fresh, and in iRacing that is precisely the assumption the tyre model punishes.
Two things decide how much this matters in a given place on the track.
How close the corners are
A long straight resets the tyre. Surface temperature sheds quickly once the tyre is rolling freely, so if turn one is followed by six or more seconds at full throttle, you can usually arrive at turn two as though turn one had not happened — unless you had already started the spiral in the corners before it. That is the exception worth remembering: three mistakes in a row and then a straight is not enough straight. But one mistake and then a straight generally is.
Corners that follow each other closely are the opposite. A sequence of two or three linked corners, with no time for the surface to cool between them, is where a single moment turns into a run of them. A quick change of direction right after a long straight is a classic example: get the car sliding on the way in, and the next corner has to be taken with the margin you just used up.
Whether you are in a race or a qualifying lap
In qualifying you have more room. A big mistake will still show in the next corner — spike the fronts hard and you will feel it at the next turn-in — but over two laps you are not punished much for the small ones, and the big ones are obvious enough that you correct without thinking. A race is different in a way a member put well: the mistakes are slow ones. A small slide you half notice, then a smaller one, then another, and by the time the car is genuinely difficult you cannot point to the corner where it went wrong. That is why this framework is a race-day tool first. In a race, the thing that needs managing is a set of small errors that would each have been fine on their own.
The dance around the limit
The workshop's other big question was how hard to push in the first place, and the honest answer has a shape rather than a number. Picture the grip limit as a line at 100%. The very fastest drivers in the world drive at something like 99% of it, all the time, and the reason that is the fastest way to drive is that going past it spikes the surface and forces a workaround in the next corner. It is also not a realistic target for most of us, because you cannot feel 99% from inside a sim.
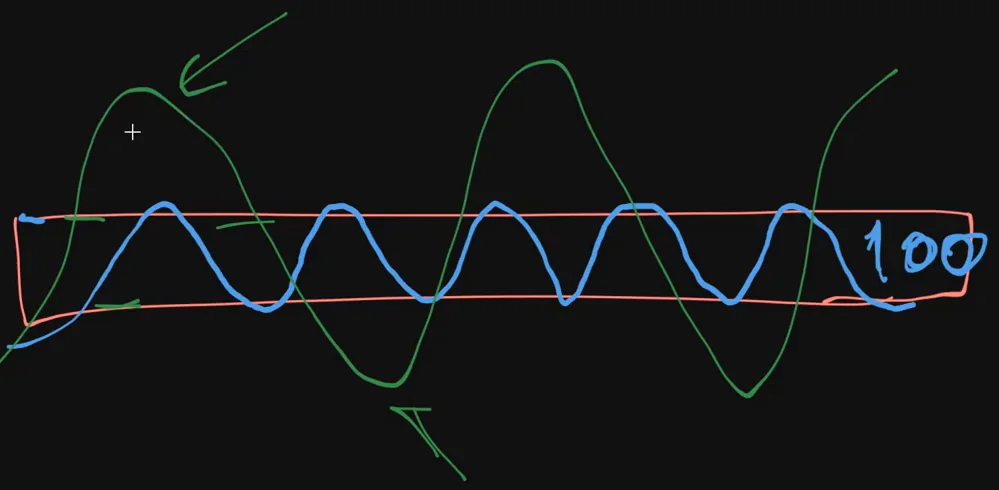
What you can do is dance around it. Go a little over in one corner, register it, take the next corner a little under, then test again. The swings are wide at first — too far over, then too far under — and they narrow with awareness and repetition until, from the outside, it looks like you are on the line the whole time. You are not. You are correcting constantly, and the corrections are small enough that they no longer cost anything.
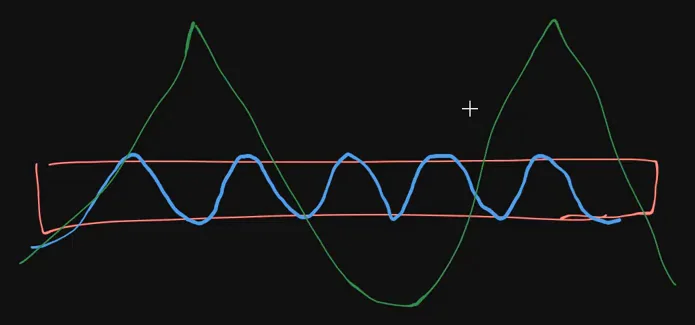
The target underneath the dance is neutral balance. No understeer, no oversteer, the car going where you put it. From there you add a fraction and see what the car does. A useful test the coach uses: if your understeer or oversteer is obvious enough that somebody watching the replay would spot it, you are overheating the tyres. If you can feel it but a spectator would not see it, you are probably driving about right.
Where to spend the tyre, and where to save it
The word is management, and management means choosing. It is not always about choosing to push the tyre less. Some corners are worth spending on, and if you save tyre in those you are simply slow. A member's question in the workshop put it exactly: do you choose which corner to abuse and which to protect? Yes, and the choice is mostly about what comes after the corner.
A corner onto a long straight
Spend here. The straight is going to cool the tyre anyway, and every bit of exit speed you leave on the table costs you for the whole length of it. On these exits you want the throttle applied aggressively, and in a GT3 you want to see the traction control light flash for a moment. Not because TC is good for the tyre — it is not — but because if you are not touching the limit on an exit like this, the chances that you are actually at 99% of it are low. You are far more likely to be at 95%, and 95% on the exit onto a long straight is a great deal of time. Going slightly over and cooling it on the straight beats being safely under.
A corner onto a short straight
Save here. There is nowhere to cash in the extra exit speed and no time to shed the heat before the next braking zone. On these exits you want no TC involvement at all. The only exception is a qualifying lap, where you push everywhere because there is no stint to protect.
If every exit on the lap has wheelspin, that is the tell that you are not managing at all — you cannot be choosing if the answer everywhere is the same. A little on some exits, none on the others, is what a managed lap looks like.
A corner where the entry is longer than the exit
This is the one that catches drivers who have learned "slow in, fast out" as a rule rather than a tendency. Some corners have a long entry and a very short exit — you are braking and turning for a long time, and then almost immediately into the next thing. In that shape of corner, over-slowing the entry to set up a beautiful exit gains you nothing, because there is no exit to gain it on. The time is in the entry, and the entry is where you should be using your front tyres.
A member pushed back, and the pushback was good: if you prioritise entry speed in a corner like that, do you not overheat the fronts for the corner after it, which is close? The answer is a scale, not a switch. Picture neutral in the centre, under-driving on one side, over-driving on the other. What "prioritise the entry" means is: stay close to neutral, but let your errors fall slightly on the entry-speed side rather than the under-driven side. It does not mean overshooting the corner. Some drivers, hearing "slow in, fast out", put their whole window on the under-driven side to guarantee the exit, and end up with a perfect exit that has no straight to pay off on. Better to miss slightly the other way.

The point of all of this is the habit it builds rather than any single decision. While you drive, you are asking: which part of this corner matters most, which axle does it need, what happened in the corner before, and what is coming after. It feels like too much to do in a race at first, and it is, which is why you do it in practice until the questions answer themselves. Then in the race you have the spare capacity, because the thinking is already done.
How to save tyres without driving slowly
This is the part people get backwards. Tyre management is usually read as "drive more conservatively", and that is not it. What you are removing is unnecessary slip, and almost none of it costs lap time — most of it was already costing you lap time.
- Fewer lockups. Faster, not slower.
- Less steering the car is not responding to. Free.
- Less wheelspin on exit. Wheelspin is not acceleration.
- Fewer big slides. A slide is a corner you did not commit to properly.
Every one of those is something a quicker driver does less of. Efficient driving and tyre-saving driving are largely the same driving, which is why "manage your tyres" and "get faster" are not the trade-off they sound like.
The real trade-off arrives further along: choosing when to spend tyre for track position and when to bank it. That decision only makes sense once the free savings are already taken, and the section above on where to spend is what it looks like once they are.
Tyres over a whole race
A member described a thirty-minute race in a way that will be familiar. The first five laps: full of fuel, in traffic, a second or so off the pace. The middle: clean air, fuel burning off, the car starting to understeer a little, brake bias down a notch, and the fastest laps of the race. The last ten minutes: tyres worn, back to being a second slower, fiddling with brake bias and never quite getting it right, and the car in front, same model, easing away by a couple of tenths a lap despite having a slower fastest lap. What was he doing wrong?
Probably nothing wrong in any one corner. The answer is about when he was spending. If you are close behind another car and pushing hard, but not making the pass, you are using tyre to achieve nothing. On a track where overtaking is only realistic in one or two places, the car in front knows it, and the driver behind is the one burning rubber to sit in the same position. It is a lot easier to hunt than to be hunted, but only if you still have tyres when the chance comes. The car in front was "chilling", in the coach's word, while the car behind pushed, and by the time the pace was needed only one of them had it.
So the practical change is to move the effort. Manage more in the phase where you cannot use the pace, and make your real push where a move is possible. Your fastest lap of the race will probably still come in the middle, when the car is at its best, and that is fine — the difference is that it should be a lap you set knowing you had more, rather than the last of what you had. It does not guarantee a result. On some tracks the car in front has such an advantage that timing is only half of it, and the other half is putting enough pressure on for long enough that they start making the mistakes instead. But it changes the odds.
The late-race decision
The second half of that member's question was sharper: late in the race, with the tyres already spent, do you accept some understeer because the car is at least predictable, or knock the brake bias down, take a bit more pace, and accept that the car gets sketchy and hard to catch if it goes?
It depends entirely on what is at stake, and it is worth deciding that before the moment arrives. If you honestly know you do not have the pace to catch the car ahead, and there is nothing behind you to lose, then there is nothing to protect: spend the tyres, go side by side, make them uncomfortable, and accept that the odds of a mistake go up, because the alternative is losing the position slowly anyway. If you have something to lose — a gap behind you, a position you are happy with — keep the car a little understeery and predictable, think in average laps, and hold. Sit close enough for long enough and a driver being hunted often makes the mistake for you. The coach's phrase for this was "nothing to lose, push; something to lose, let them go", and it is a racecraft decision as much as a tyre one.
What the pace itself should look like across those phases, and how quickly to reach it from the start, is the subject of sim racing race pace. This page is only about what the tyres let you afford at each point.
A full stint in an endurance race
For a stint of an hour or more the priorities shift, and they shift in a direction that surprises people: wear matters less than you would think, and the front-to-rear relationship matters more.
Wear matters less because you will almost certainly change tyres at every stop. Double-stinting a set used to be a thing in iRacing, and there was a time when saving tyres bought you a shorter pit visit. Now the fuel fill takes as long as the tyre change, so there is nothing to gain by keeping a set on, and everyone takes fresh rubber. The tyres will degrade more over an hour than over twenty minutes, obviously, but they degrade on everyone, and you are not trying to make them last two stints.
What you are trying to do is keep the two lines close together for a very long time, and you do that by driving at something like 95% for most of the stint. Neutral balance, no big moments, and the acceptance that a personal-best lap somewhere in the middle of it is worth almost nothing. One lap out of twenty-five is not what decides a stint; the average is, and a driver who bins it at 99% in lap fourteen has thrown away a lot of laps to set one.
The one refinement is the test lap. Driving at 95% has a failure mode, which is that it slowly becomes driving at 85% without you noticing. So a few times per stint, when you are comfortable, push a little — not to 100%, but enough to check where the limit currently is — and the moment you feel anything unsafe, abort and drop back. The point is not the lap time. It is confirming that your comfortable pace is still a competitive one. Members who tried this reported it was worth doing even in forty-minute races, where the tyres at the end feel nothing like the tyres at the start.
One question that comes up is left-to-right imbalance on circuits that turn mostly one way. It is real, one side will run hotter, and it is not something to manage with your driving. It is the setup's job — anti-roll bars, springs, the rest of it — and even then the outer side will be a little warmer. Do not spend attention on it that belongs on the front-to-rear balance, which is the one your feet and hands control.
Cold tyres at the start of a stint
The first laps are their own problem. Below the working window the surface is stiff and the grip simply is not there yet, which is where a lot of first-lap incidents come from — a driver braking on lap one at a marker set on lap ten.
Give the first lap or two more margin: brake earlier, less lock, no wheelspin. Then bring your references back in as the tyre comes to you. How much margin, and how quickly to give it back, is the subject of sim racing race pace, where the cold-tyre reset drill lives.
What to do on the formation lap
Members ask whether to warm the tyres on the formation lap, and the honest answer depends on where you are starting. The community testing that has been done on this is fairly clear on two points: if you do nothing on the formation lap, your first lap will be a little slower, and that is close to certain; but the techniques that make lap one fastest — weaving, dragging the brakes — can leave the tyre a little worse a few laps later than if you had let it come in on its own.
So the question is not "should I warm them" but "how much do the first laps matter to me". Starting in the top five, they matter a lot: you have some clean air, you want to pull a gap before the pack settles, and you should prepare the tyres to be at their best immediately. Starting on pole, more so. Starting mid-pack or further back, they matter much less, because even with maximum grip you cannot use it — you will be behind someone within a corner. From there it is better to take the formation lap gently, let the tyres come up naturally, and arrive at the part of the race where you can actually use the pace with more tyre left to use it. The starting-position logic for the whole opening phase is in the race pace guide; this is only the tyre side of it.
Preparing tyres for a single flying lap is a different job with a different technique, and it has its own page — the qualifying out lap covers core versus surface temperature and what to do in the one lap you get.
Reading the numbers without chasing a target
The single biggest mistake people make with tyre data is looking for one correct temperature. There is no universal optimum across iRacing — operating windows vary by car, construction, compound, track temperature, and whether you are on wets. A number lifted from another car or another sim is worse than no number, because it feels like information.
What travels is the pattern. Across the three bands on one tyre, a consistent skew tells you how the tyre is being worked — whether one shoulder is taking far more than the rest, which is a camber and pressure conversation. Between the axles it tells you which end you are leaning on. And across a stint, the direction of travel tells you whether what you are doing is sustainable.
Compare like with like: your own numbers, same car, same track, same conditions, one change at a time.
The delta bar is the tyre gauge you actually have
A member asked how you know when the tyres have gone off if you cannot see the temperature. The answer is the same one we use in the rain, where it matters even more: watch the delta bar against your session best or your previous lap, and pay attention to the corners where you know you drove well. If you take a corner and it felt flawless — clean entry, good rotation, throttle where you wanted it — and the delta still loses time through it, the tyre's window has moved. The car is not doing what the same inputs did three laps ago. That is the drop-off, and you can see it lap by lap without a single number from the tyre.
Where the drop-off comes varies enormously by track. On a long, fast circuit the tyres can be out of the window within a few laps of pushing; on a short one it takes far longer. There is no rule that gives you the lap, but there is a way to learn it for a race you care about: run the stint in practice, in the same conditions, and note where the delta starts going the wrong way on your clean corners. A member did exactly this for a league qualifying session with an open fuel load and a limited time, and found that past a certain number of laps on the tyre the times were slower no matter how well he drove — so he knew the answer before the session started. It is not efficient, and you would not do it for a race you did not care about. For one you do, it is the only way to know.
Feeling it before the data does
Because for most cars the seat is the only live instrument, it is worth training it deliberately. Three things from the workshops, all cheap.
Say it out loud
In coaching sessions with newer drivers I ask them to say "understeer" or "oversteer" out loud as it happens. Partly so I know they can tell the difference, because a surprising number of drivers cannot yet, and everything on this page depends on it. Mostly because saying it reinforces the feeling and makes you notice the moment rather than let it blur into the next corner. Try it in practice for a session, then record the session and check yourself. If you have a lap review perk, this is a good use of it: send the lap and ask, plainly, whether that was understeer in turn three.
Light hands
A member described turning his force feedback strength up a long way and, for the first time, feeling the front of the car overloaded going into a corner — something he had never felt at his usual setting. That is the right first step: high force feedback to learn what the information feels like. It is not where you want to end up, because a heavy wheel is slow to move through a fast chicane and tiring over a stint. The bridge between the two is light hands. Drive with the wheel held far more loosely than you do now, in the corner phases where you were missing detail, and you will find that a lower force feedback setting gives you most of what the high one did, with hands that can move quickly. The car will also correct a great deal of its own oversteer if you let it, and you can only let it with a light grip.
Hear the tyres
Members regularly say they cannot hear the tyres in iRacing at all, and in every case so far the fix has been the audio settings: engine and everything else turned well down, tyres at full. It is less immersive and it is worth it, because tyre noise is the fastest feedback you have about slip. Once you can hear them, there is a drill. Take two of your own laps, one you know was driven under the limit and one at or past it, and listen to them with your eyes closed, as though they were music. The first goal is to tell which is which. The second is to hear, in your own fastest lap, where you were not at the limit and where you were over it. It is much easier to learn this by ear than by watching, because when you watch, the sound stops getting your attention.
How to tell if you are killing your tyres
From the seat, before you look at any data:
- Fronts — your steering angle creeps up over the stint, understeer gets progressively worse, lockups repeat in the same braking zone, and you find yourself waiting longer and longer before you can turn.
- Rears — exit traction gets worse lap by lap, the car moves around more under braking, oversteer arrives earlier in the run, and the throttle becomes something you feed rather than apply.
The word doing the work in both lists is progressively. A car that is difficult from lap one is a setup or a technique problem. A car that is fine and then is not is a tyre problem, and the cause is usually in the first few laps rather than the ones where it finally shows.
One more from the workshop, because it trips up drivers who are working on their technique: if you arrive at a corner after two or three mistakes and try a new technique there, it will not work, and you will blame the technique. Trail braking "does not work" a lot of the time because the fronts were already cooked before the corner where it was tried. When a technique fails, the first question is what happened in the corners before, not whether the technique is wrong.
Ten ways to lose a stint
- Repeated front lockups, even small ones.
- Adding steering when the car has already stopped responding to it.
- Wheelspin on every exit rather than the occasional one.
- Sliding the car more than the corner requires.
- Driving qualifying pace on lap one of a stint, on cold tyres.
- Treating every corner as though the car arrived at it fresh.
- Pushing hard behind a car you cannot pass, and having nothing left when you can.
- Warming the tyres aggressively from the back of the grid, for pace you cannot use.
- Ignoring the balance changing across a run instead of adapting to it.
- Assuming every iRacing car's tyres behave alike. They do not, and the model has been rolled out class by class.
Test it against yourself
Two stints, one change
- Stint A — eight to ten laps attacking everything. Record every lap time.
- Stint B — same fuel, same conditions, and one instruction only: no lockups, no wheelspin, no steering the car is not answering.
- Compare three things: your first lap, your last lap, and your average across the run.
Most drivers find stint A wins on the first lap and loses badly on the last, and that the averages are not close. Judge yourself on repeatable pace, not a personal best you produced once.
The next-corner drill
- Pick two corners that follow each other closely, with no straight between them.
- Deliberately overdrive the first one — brake a little too late, carry a little too much in — and then take the second one exactly as you normally would. Notice what the car does.
- Repeat, but this time take the second corner a fraction softer, in proportion to how big the first mistake was.
- Then find the grip limit in that second corner on its own, from a clean first corner, so you know what it feels like when the tyre has not been asked for anything yet.
Take everything on this page as a black box until you have done this. You do not need to believe the mechanism. You need to feel what the previous corner did to the next one, once, in a place where it costs you nothing.
The tyres are reporting, not deciding
Almost everything on this page is a driving habit wearing a tyre problem's clothes. That is good news, because habits are cheaper to change than setups and they transfer to every car you drive. Tyre management comes tenth in the twelve driving techniques every driver should master for exactly that reason: it depends on the nine habits before it.
The other reason it is good news is the one the workshops kept coming back to. Mistakes are part of racing. An oversteer moment in a race is not the end of anything, and it does not feel like damage. What separates drivers who keep their tyres from drivers who do not is not that the first group makes fewer mistakes. It is that they notice each one as it happens, acknowledge it, and drive the next corner accordingly — almost as if spectating their own race. The whole point of rehearsing this in practice is that in the race you are not spending mental capacity working it out; you already know, and the capacity goes into the decision.
What is genuinely hard is telling which habit you have. Lockups, entry overdriving, and steering a saturated front all end the stint the same way, and from inside the car all three feel like a car that will not turn. If the fronts are gone by lap six and you cannot say why, that is what lap reviews inside the GitGud Racing Academy are for — you send a lap, and a coach tells you which of them you are actually doing. The two workshop recordings this page draws on are available to members as Tire Management Workshop (Slot A) and Slot B, with the full discussions the examples above are taken from.
iRacing tire management FAQ
How do you manage tires in iRacing?
Mostly by removing unnecessary slip rather than by driving slowly. Every moment a tyre is sliding rather than rolling — a lockup, wheelspin on exit, a front washing wide, a rear stepping out — is energy going into heat and abrasion instead of moving the car. Cut the lockups, stop adding steering the car is not responding to, keep the rears from spinning on exit, and give the first laps of a stint more margin while the tyres are cold. Almost none of that costs lap time, because most of it was already costing you lap time.
How do you check tire wear and temperatures in iRacing?
In the Tire Info black box, on F6 by default. For each corner you get three temperatures across the tread — inner, middle and outer — and three matching tread figures. Two things catch people out: it is not a live readout, because iRacing updates it only at pit stops and shows the last set of tyres taken off the car, and the tread figure is percent remaining rather than percent worn, so 100% is a fresh tyre. Read that backwards and you will pit far earlier than you need to.
What temperature should iRacing tires be?
There is no single correct number across iRacing, and chasing one is the most common mistake people make with tyre data. Operating windows vary by car, tyre construction, compound, track temperature and whether you are on wets, so a figure lifted from another car or another sim is worse than no figure at all because it feels like information. What does travel is the pattern: how the three bands across one tyre compare, how the two axles compare, and which direction everything is moving across a stint.
Why are my front tires overheating in iRacing?
Usually one of two habits. Repeated front lockups, even small ones, because a locked tyre is sliding rather than rolling and puts heat into the surface very quickly. Or steering the car after it has stopped responding — when the fronts are already at their limit, extra lock adds slip angle past the point of peak grip, so you get no more rotation and a great deal more heat. The test for the second one needs no numbers: if adding steering is not producing more rotation, stop adding steering and fix the entry speed instead.
Why do my rear tires overheat in iRacing?
Wheelspin on corner exit is the most common cause by some distance: whenever the rears are turning faster than the car is travelling, grip is being converted into heat instead of acceleration. An occasional slip is nothing, but the same slip on every exit for twenty laps is a stint. Sliding the rear more than the corner requires is the other, which is worth distinguishing from rotation — a car that rotates well points at the exit early rather than spending the corner sideways. A rearward brake bias can also contribute, though that is car-dependent.
Do lockups damage tires in iRacing?
Yes, and disproportionately for how brief they are. A locked tyre is sliding rather than rolling, which spikes surface temperature quickly, and if it locks for long enough it leaves a flat spot you then carry for the rest of the stint. Small lockups are the ones worth hunting because they are easy to miss from the seat — the usual cause is arriving with more brake pressure than the available grip supports, and braking slightly earlier, or at the same point with a little less peak pressure, generally removes them at no cost.
How do you save tires without driving slowly?
By removing slip rather than removing pace, which are not the same thing. Fewer lockups, less steering the car is not answering, less wheelspin on exit and fewer large slides are all things a quicker driver does less of anyway, so the savings are free. Conservative driving only becomes a genuine trade-off later, when you are deciding whether to spend tyre for track position — and that decision only makes sense once you have already taken everything that costs nothing.
How do you manage tyres corner by corner in a race?
By letting the previous corner decide the next one. If the corner you just drove was clean, push as normal. If you had a moment — understeer, a slide, a lockup — take the next corner a little softer, in proportion to how big the mistake was, because the tyre arrives with less grip than usual and asking for the usual amount is what starts the spiral. A long straight in between resets the surface temperature; corners that follow each other closely do not. The corner-by-corner method.
When should you push your tyres in a race and when should you save them?
Spend on corners that lead onto a long straight: push the exit, accept a brief flash of traction control, because the straight cools the tyre and every bit of exit speed pays for its whole length. Save on corners that lead onto a short straight, where there is nothing to cash in and no time to shed the heat. And in a corner with a long entry and a short exit, the time is in the entry, so use the fronts there rather than over-slowing for an exit that has nowhere to go. Where to spend the tyre.
Should you warm up your tyres on the formation lap in iRacing?
It depends on where you start. Doing nothing makes your first lap a little slower, but aggressive warming can leave the tyre slightly worse a few laps later. Starting near the front, the first laps are worth a lot — you have clean air and a gap to pull — so prepare the tyres to be at their best immediately. Starting mid-pack or further back you cannot use maximum grip anyway, so let them come in gently and keep more tyre for the part of the race where the pace matters. The formation lap by grid position.
How do you know when your tyres have gone off in iRacing?
Watch the delta bar against your session best or your previous lap, and pay attention to corners you know you drove well. If a corner felt clean and the delta still loses time through it, the tyre's window has moved: the same inputs are no longer producing the same result. It is the method used in the rain, where reading the grip a lap early is decisive, and it works in the dry without any temperature readout at all. Reading the delta bar as a tyre gauge.
Does traction control heat up the rear tyres in iRacing?
Yes. Traction control catches wheelspin that is already happening, so every intervention is heat the rear tyre has already been given. In a GT3 the aim is to keep the involvement small: no TC on exits onto short straights, and only a brief flash on exits onto long straights, where being slightly over the limit costs less than being safely under it. If the light flashes on every exit, you are not choosing, and choosing is what management means. Which exits are worth it.
This guide is part of the free library at GitGud Racing Academy — an online sim racing academy built around weekly lap reviews, structured courses, drills and training tools.
Train this the right way
Reading is step one. Build it into muscle memory with structured, car-specific courses and personal lap reviews from a coach — inside the Academy.
Join the Academy · $39.99/mo incl. VATWatch the full video on YouTube