How to Brake Later in Sim Racing Without Ruining the Corner
Every driver who has ever compared their lap with a faster one has noticed the same thing first: the other driver brakes later. So they go out and brake later. And it almost never works — the car arrives at the corner with too much speed, the apex goes missing, the exit is a mess, and the delta is worse than before. So they conclude that braking later is for braver people, and go back to their old marker.
The conclusion is wrong, and this page is about why. Braking later is not something you decide to do. It is something you earn, by becoming better at stopping the car in a straight line — and once you are, the later braking point simply arrives, without anyone needing to be brave. What follows is the sequence I teach for it, built around a live Academy workshop on braking and the questions the group asked along the way. If you want the philosophy of why we brake at all, that has its own page and I will point you to it. This one is about the braking point itself: what it is, why yours is where it is, and how to move it.
How do you brake later in sim racing?
Start with a braking point that is comfortably too early, and fix the corner exit first. Then make your straight-line deceleration more efficient: no throttle-brake overlap, a quick build to peak pressure, no time spent deep in ABS or micro-locking, and early first downshifts. Every one of those recovers distance. Only then move the braking marker later, in small steps, and keep it only if the exit stays clean.
What is a braking point?
A braking point is the place on the track where you begin to apply the brake for a corner. A braking reference, or braking marker, is the thing you use to find it: a distance board, a kerb, a change in the tarmac, the end of a barrier. The two are not the same, and confusing them is the first reason people get stuck.
The reference is fixed. The braking point is a decision, and it depends on your entry speed, your peak brake pressure, how quickly you reach that pressure, when you downshift, whether the tyres are up to temperature, and what you intend the car to do at the apex. Change any of those and the same reference produces a different corner. That is why "brake at the 100 board" is not an instruction that transfers from one driver to another, and why a braking point copied from someone faster is usually the wrong one for you, in both directions.
Finding good references is a separate skill, and it has a separate page: what to use when there are no distance boards, and how to build one you can repeat, is in the corner-by-corner method. Here I am assuming you already have a reference you can hit, and asking the more interesting question: why is your braking point where it is, and what would it take to move it?
Braking later does not automatically make you faster
This needs saying once, briefly, before we do anything with the marker. The purpose of braking is not to lose as little time as possible on entry. It is to set up the exit. On the overwhelming majority of corners the exit is physically longer than the entry — measure the distance from turn-in to apex against the distance from apex to the next braking zone and you will see it — and time gained on a long section beats time gained on a short one. A later braking point that produces a slightly worse exit is a net loss, every time, and the loss is invisible if you only look at the braking zone.
So the standard I hold every braking change to is simple: did the exit get better, or at least stay the same? If braking later costs you a clean, early, single throttle application, it was not later braking. It was overdriving the entry, which is a well-documented way to be slow. That whole argument — exits first, the brake trace as a by-product rather than a target — is laid out properly in trail braking explained, and I am not going to repeat it. Read that if the idea is new; the rest of this page assumes it. Two neighbours make the same point from different evidence: the telemetry guide shows what "later but not better" looks like in two overlaid traces, and braking mistakes shows the habits that produce it. This page is the constructive version: not why it fails, but how to do it so that it does not.
Why copying a pro's braking point does not work
One member brought the perfect example to the workshop. In the track guides for a well-known circuit's first corner, the fast drivers brake at the 50 metre board. So they tried it, and there was no way to make the corner from there. The 50 works for that driver because of everything else they are doing at the same time — the pressure they reach, how fast they reach it, when the downshifts land, how much speed they carry through the apex — and the braking point is one variable in that system. Copying one variable out of a system does not give you the system. The full version of that argument, and the exit-first sequence that follows from it, is on trail braking explained; I am not going to restate it.
The one thing worth adding here is about time. Reaction time is not the limiting factor for any driver I have coached, at any age. Perceiving time is — the time you have to notice what the car is doing — and more entry speed means less of it. A slower entry buys you more while you learn, which is the practical reason the sequence below starts from the early end and works forward.
Start earlier, then bring the point forward
Here is the sequence, and the order is the whole point.
First, back your braking point out. Not slightly — substantially. If the pro brakes at the 50, brake at the 100, for the purpose of learning the corner rather than as a way to race it. Treat what happens under braking as a black box for now, and use the margin to get the exit right by the three criteria on the trail braking page: one committed throttle application, all of the track used on the way out, the steering unwinding rather than being added. Then push the throttle point a blink earlier, lap after lap, while those three hold.
Once the exit is stable, and only then, you have earned the right to work on the entry. And the work on the entry is not "brake later." It is stop the car more efficiently — in the shortest distance you can manage without unsettling it. Every inefficiency under straight-line braking costs you metres, and every metre it costs you is a metre earlier you are forced to brake. Remove the inefficiencies and the braking point moves later on its own, because you no longer need the distance.
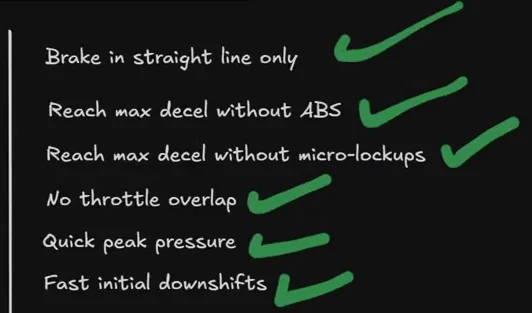
Look at that list and notice that none of it requires courage. Every item is either a habit you can change or a threshold you can measure. That is why this approach works when "just brake later" does not: it replaces a feeling with a set of things you can actually check.
Step 1: brake in a straight line, and look at what is wrong with it
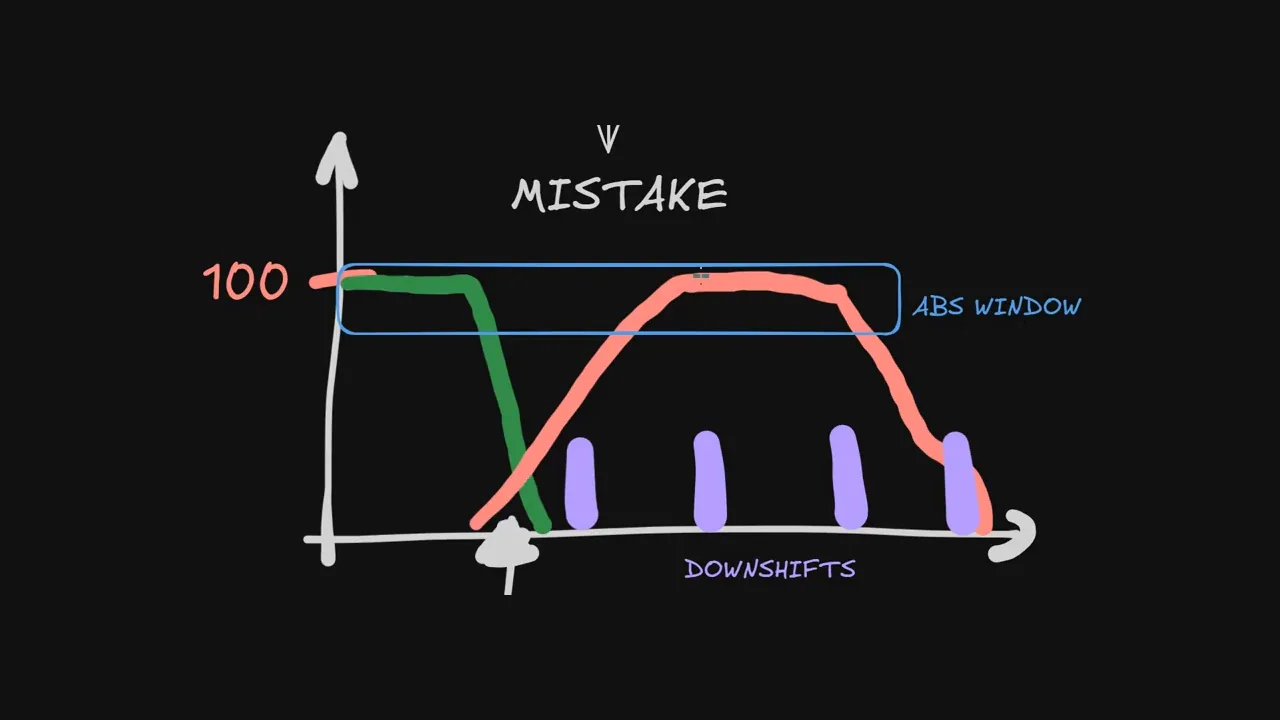
Everything from here to the section on moving the marker is about the same drawing. In the workshop I put up a brake trace that had every common inefficiency in it at once, and we went through them one at a time. It is worth having the whole thing in front of you first.
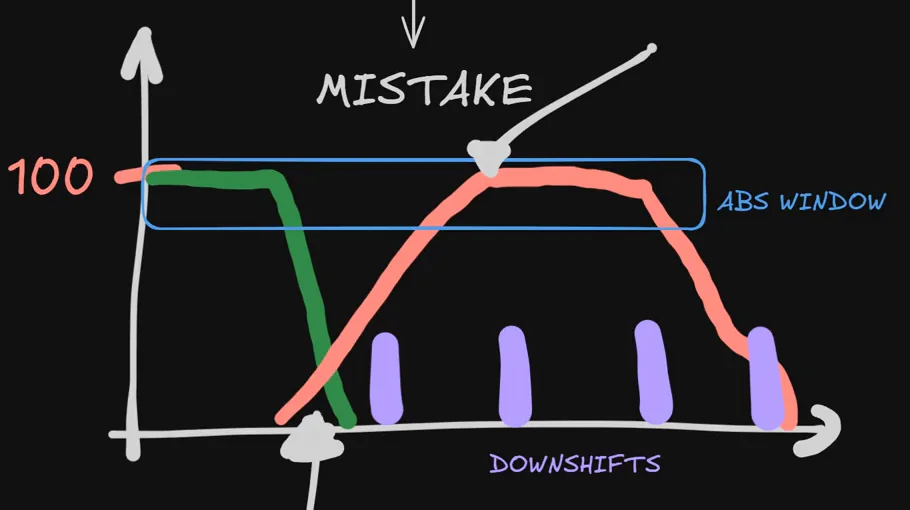
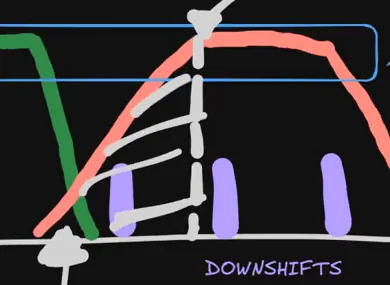
Read it left to right, as the car experiences it. The green throttle line is still coming down when the red brake line starts up — that is overlap. The brake line then takes its time reaching peak, in a gentle curve rather than a decisive rise — that is a slow build-up. The plateau at the top sits inside the blue box marked ABS window, close to its upper edge — that is braking past the grip limit. And the purple bars underneath, the downshifts, are spread out later than they should be — that is deceleration you paid for and did not collect.
Not one of these is about bravery, and not one of them is about the braking point. But each of them lengthens the braking zone, and together they can easily explain a driver who "cannot brake at the 50." Take them in turn. (Reading the shape of a brake trace more generally — the four shapes a trace can take and what each one says about the corner — is sim racing braking technique. This page reads one trace for one purpose: distance.)
Step 2: find the ABS or lock-up threshold, and stay under it
Maximum deceleration happens just below the point where the tyre stops gripping and starts sliding. In a car with ABS, that boundary is the ABS window: push into it and the system starts cycling the brake to keep the wheel turning. In a car without ABS, the boundary is a lock-up, and the early warning is a micro-lock — a wheel that stops for a fraction of a second and then recovers.
The instinct is that ABS is a safety net, so leaning on it must be fine. It is a safety net. It is also slow, in two ways. First, the tyre in a cycling ABS is alternating between too much slip and not enough, and neither of those is maximum grip, so the car takes longer to stop. Second, and this is the one that catches good drivers, the ABS is still active as you begin to release the brake and turn in. That is exactly the moment you want a decisive response from the front axle, and instead you get a lazy, delayed turn-in, because the front tyres are still busy being managed by the system. The braking zone got longer and the entry got worse.
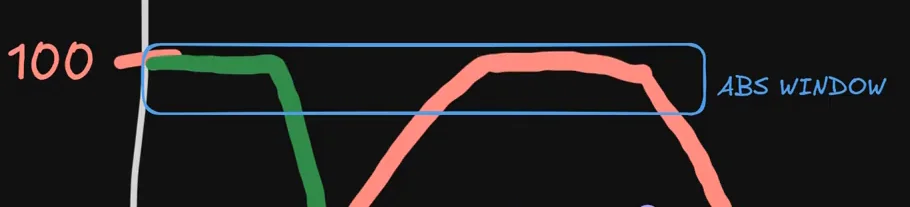
So the target is to brake under the window, or to dip into its lower edge, and never to park at the top of it. How do you know where you are? Not by feel, at first. In practice, put an input overlay on screen that shows ABS activation, or watch the ABS light on the dash, and brake until you find the pressure at which it starts triggering. That number is your threshold in that car, and it moves with tyre temperature and load, so it is worth finding again at the end of a stint. The full mechanics — what the system is doing to the tyre, and the situations where using it deliberately is right — are in the GT3 driving guide, which has a whole lesson on it.
Without ABS, the signals are shorter and you have to be looking for them. A micro-lock is a distinct, brief change in the force feedback, and a distinct sound, and it is over almost before you have registered it. You can also see it: watch the replay of a heavy braking zone and look for the front wheel that stops rotating for a single frame. It is usually the unloaded one — the inside front on a downhill entry, for instance, because it is the lightest wheel on the car. If you find even one frame of it, you were over the limit, the tyre temperature spiked, and the corner entry was compromised. Braking a non-ABS car properly is its own technique with its own shape, covered in the formula driving guide.
Where exactly that limit sits, and how to bracket it in one corner without guessing, is the subject of finding the grip limit. For this page, the operational rule is enough: find the threshold with an overlay, then brake just under it, every time.
Step 3: stop overlapping the throttle and the brake
Throttle-brake overlap is the pedal equivalent of pressing the accelerator with the handbrake on. For the fraction of a second that both are applied, the engine is fighting the brakes, the tyre is being asked to transmit two opposing loads, and its temperature goes up for nothing. It is one of the most common habits I see in coaching sessions and one of the least noticed, because it feels like nothing — it is just the right foot starting its job a moment before the left one has finished.
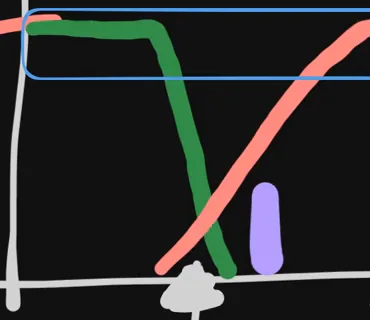
The fix a member relayed from a 10K driver's coaching is the one I would give too: lift off the throttle, count to one, then brake. It feels absurdly slow. It is not slow in lap time, because the coasting moment is tiny and the alternative was cooking the tyre, and it is very easy to close the gap later once the habit is gone. Coasting briefly is better than overlapping.
One honest qualification. In GT cars this is not negotiable — I do not know a genuinely fast GT driver who overlaps, at any level up to esports. In formula cars you will see highly rated drivers who do, and the cost is smaller, because those cars want the brake to peak almost immediately and there is less time for a clean handover. I would still avoid it. But if you race open-wheelers and you see an overlap in your trace, it is a smaller problem than the other three on this list; if you race GT cars, it is a real one.
Step 4: reach peak pressure faster, without spiking it
Between the moment the brake starts to rise and the moment it reaches its peak, the car is not decelerating as hard as it could. That interval is pure distance. The longer you spend in it, the earlier you have to brake to compensate, and I see drivers spend a surprising amount of their braking zone gently approaching a pressure they could have reached almost at once.
This one is a two-edged sword, and I want to be careful with it. The answer is not a vertical stab to 100%, because a spike gives you no control and, in most GT cars, no time for the weight to transfer onto the front tyres before you are asking them for everything. Watch fast GT3 drivers and their initial application is not a straight line up; it is quick but slightly eased, to let the load arrive. The target is a rhythm in which you are not wasting distance getting to peak, but you are not so abrupt that you overshoot the threshold you found in step 2. The trace of a good braking zone in a GT car rises with purpose and then lives just under the ABS window, and the whole rise takes a fraction of the time most drivers give it.
A member offered a picture for this that I liked enough to steal. Think of the rise as an angle on a protractor. Below about 70 degrees, you are leaving a lot on the table — too gentle, too long. Somewhere past 90, approaching vertical, you are hurting the tyres and spiking the heat. The useful window is in between, and it will move from car to car and driver to driver, which is why the picture is more helpful than a number.
How do you check your own? Compare your trace against a decently fast reference in the same car. Look at the peak pressure in a given corner, then look at how much time each of you spent getting there. If yours is visibly longer, assume you are spending too long and shorten it, watching that you do not start tripping the ABS. Reading telemetry covers how to line two laps up so that comparison is fair. And if you find that you cannot hit the same peak twice in a row, the limiting factor is often the pedal itself rather than your foot — brake pedal setup deals with dead zones, maximum force and the leverage to make a repeatable peak physically possible.
Step 5: downshift without destabilising the car
Downshifts are free deceleration, and most drivers collect them late. Engine braking is only working once the lower gear is engaged, so every moment a downshift is delayed is a moment the engine is not helping the brakes. Here is how I coach the timing, using a four-downshift corner as the example.
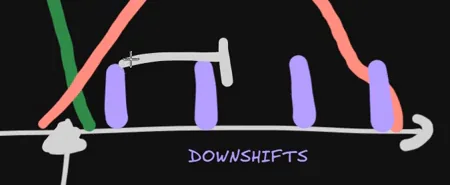
The first two: as soon as you can. Any modern GT3 or GT4 has downshift protection, so you cannot over-rev the engine by asking early; the car will simply take the gear when it is safe. So take it. Do not wait for a feeling. You get engine braking in earlier and the only cost is slightly more heat in the rear tyres, which in my experience is far outweighed by the deceleration you gain. I see the opposite — drivers waiting, and waiting, for a downshift they could have had a second ago — in a large share of coaching sessions.
The last one: timed, not spammed. The final downshift is a different animal, because it changes the balance of the car, and it always changes it in the same direction: towards oversteer. It cannot give you understeer; it can only free the rear. That makes it a tool, and tools want timing. Land it while you are turning in and you have added a rotation input on top of the steering, which in some cars and some setups is exactly what you wanted and in others is a snap you now have to catch. Land it a little before turn-in and the car is settled when the steering goes on. My default is a little before, and then I move it based on what the car tells me.
A member brought a case that shows the two directions at once. In a fast, long corner where you brake and turn almost simultaneously, they had found they were quicker not downshifting at the braking point, holding the higher gear well into the corner and only dropping a gear once the car was rotated and pointing at the apex — against everything they thought they knew. It was not wrong. Downshifting at the braking point in that corner was generating more oversteer than they could use, forcing corrections, and the corrections were costing more speed than the engine braking was saving. Delaying the shift kept the car stable, and a stable car carries more speed. The check was in the exit: their ghost caught them back on the way out, which told us the gain on entry was partly being given back, and the honest answer was that both timings were about equally fast, and the later one was the one that did not need a correction.
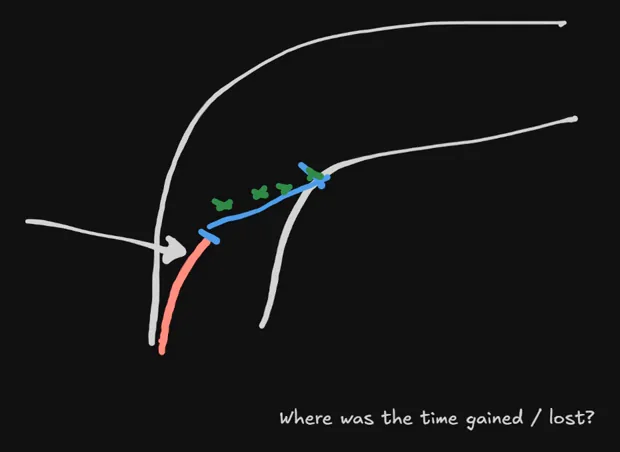
It works the other way too. Another member described a teammate at a chicane who would pull one extra gear, lower than the corner needed, whenever the car felt like it was going to overshoot — using the downshift as a brake. And there are corners where the right answer is not to downshift at all, because the car would snap if you did. The last downshift is a balance control that happens to also slow the car; treat it that way. Its full use as a rotation tool, alongside brake bias and the trail phase, is covered in car rotation, and the underlying reason it always frees the rear is weight transfer.
Step 6: now move the braking point later
You have a clean exit. You are under the ABS threshold, you are not overlapping, you reach peak quickly, and your downshifts are early. Your braking zone is now shorter than it was — not because you are braver, but because you are wasting less of it. Time to collect.
- Move the reference by one small step. One board, five metres, one kerb-length. Not "later." A specific, repeatable amount.
- Drive it five times. One lap proves nothing; you might have got lucky, or been slow elsewhere.
- Check the exit, not the entry. Did you still get a single throttle application? Did the car still run to the outside without you steering it there? Did the steering still unwind? If yes, keep the new point.
- Check the delta over the whole corner, through the next straight. A later braking point that is faster at the apex and slower on the straight is a loss.
- Repeat. Another step. The same test. Stop the moment the exit degrades, and go back one step.
If that protocol looks familiar, it should: it is the one-variable-at-a-time method that how to learn a track uses for every reference on a new circuit, applied to a single reference on a circuit you already know. The difference is only what you are holding fixed. There, the line is still being found; here, the line is settled and the exit is the thing you refuse to trade.
Two things about the size of the win. First, be honest about where the time is. The time you lose by braking a car-length early is small — a few hundredths, on a section that lasts a couple of seconds. The time available on the exit and the straight that follows is much larger, because that section lasts far longer. You are not giving up as much as it feels like by keeping a small margin on entry, and you gain far more than it feels like by protecting the exit.
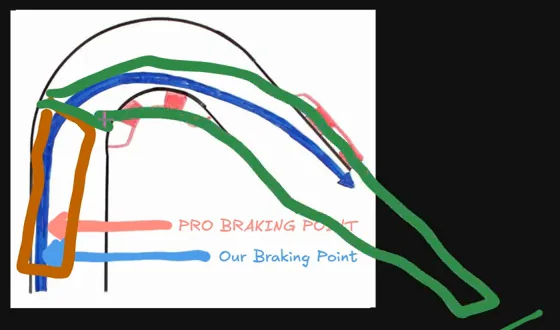
Second, and this is the pill I found hardest to swallow myself a few years ago: you will probably never brake at the pro's marker, and it does not matter. Blink-of-an-eye earlier, ten metres earlier — drivers are genuinely fast from there. What the efficiency work gets you is close to the fastest possible braking point, the esports-level one, and close is enough when the exit is right. Leaving a little time on the entry, knowingly, feels wrong, and that feeling is precisely the thing that keeps most drivers focused on the braking zone and away from where the lap time actually is.
How do you know you have braked too late?
The signals are consistent, and they are all downstream of the braking zone, which is why drivers who only watch the braking zone miss them.
- You miss the apex, or you make it only by adding steering. A correct braking point puts the car at the apex with the steering already unwinding.
- ABS is still cycling into turn-in. If the light is on, or the pedal is pulsing, as you start to steer, you were too deep in the window at the point you needed the front tyres for something else.
- The throttle is late. You are still gathering the car when you should be on the power. Any braking change that delays the throttle point has failed, whatever it did to the entry.
- There is a correction on the exit. A lift, a steering catch, a second throttle application. The entry speed was more than the exit could absorb.
- The delta got worse. Faster to the apex and slower to the end of the next straight. This one is unambiguous, and it is the reason the test in step 6 runs through the straight.
- The ghost catches you back. You pass the reference lap in the braking zone and it re-passes you before the next corner. You bought the entry with the exit.
If two or more of these are showing up and you have already moved the marker back a step, the problem is likely not the braking point at all. It is one of the four inefficiencies above, which are making the braking zone longer than it should be at any point, and there is a separate page for the habits that produce that — braking so hard the car cannot turn, dancing on the pedal, misreading gradients — in sim racing braking mistakes. The release side, which is what happens after the peak and is where rotation comes from, is how to trail brake.
When an earlier braking point is actually faster
I want to end the technical part with the counter-intuitive case, because it is real and because it changed how I think about the whole subject.
A member who watches a lot of onboard footage from a 10K driver described that driver's braking in a cup car, and it surprised the room. The brake trace was nearly symmetrical — the same intensity going from zero to peak as coming back down from peak, with none of the long trailing release most of us have been taught to admire. And the driver was braking early, and never seemed to go above around 60% pressure. No 80s, no 90s. Their reasoning, as far as anyone could tell: tyre temperature. At that level the driver knows exactly what the tyre will do, and keeping it below the point where it spikes means it does the same thing two laps later, whereas the rest of us can drive the identical corner two laps apart and go wide the second time because the temperature has crept.
A second member had found the same thing by accident. Practising for an endurance race, they spent a hundred laps fuel-saving: lifting early, braking gently, coasting to the apex. Then they tried a flat-out lap without any of it — and found their judgement of corner speed and their ability to brake into the corner had improved noticeably, because those hundred laps had taught them what the correct apex speed actually felt like, rather than what a late braking point felt like. Their apex speeds had been the thing costing them time all along, and the fuel-saving had fixed it as a side effect.
Both stories point at the same thing, and each of them touches a subject with its own page. The second member's discovery — that the apex speed, not the braking point, was where the time lived — is the whole thesis of sim racing braking technique. The first member's observation rests on tyre temperature, and why a tyre that has crept out of its window behaves differently two laps later is tyre management. And repeatability itself, why one lap agrees with the next or does not, is its own diagnosis. What this page takes from all three is one conclusion: an early braking point with modest pressure keeps the tyre in its window, protects the exit, and is repeatable in a way that a late, hard braking point is not. It is not a beginner's compromise. On one member's reading of the footage it is what one of the fastest drivers in the service chooses, on purpose — and whether or not the 60% number is exact, the reason it looks slow to us is that we are measuring the wrong section of the corner. A member summarised the workshop in a sentence I have used since: go slower to go faster, and remind yourself of it, because you will forget.
Questions from the workshop
"When do we start moving the braking point later?"
After the exit is stable and after the deceleration is efficient, and not before. The question was asked right at the moment in the session when we had finished the exit work, and the answer was the whole of step 1 to step 5. If you move the marker before the braking zone is efficient, you are compensating for the inefficiency with entry speed, and entry speed is the thing that breaks exits.
"If I brake early enough, should I stop trail braking altogether?"
Not for ever, but temporarily, yes, if it helps. In the learning phase it is perfectly acceptable to brake early, in a straight line, coast briefly, and give all your attention to the exit. Be clear that this is a practice tool: you cannot race like that, and even a perfect exit is slow if you coasted to reach it. Once the exit is consistent, the coasting gets eliminated and the brake release starts to overlap the turn-in, which is trail braking, and the feel you are chasing at that stage is the car continuing to rotate all the way to the throttle. That feeling is what trail braking explained is about, and it comes after this page rather than instead of it.
"Is a more aggressive initial application better in a formula car?"
Yes, and the whole shape is different: a formula car wants the brake at its peak almost instantly and then released in a straight line with no reapplication, because the downforce that gave you the grip at the start of the braking zone is disappearing as you slow. The window for reaching peak pressure is far shorter than in a GT car, and the tolerance for overlap is, as above, a little higher. Everything in step 4 still applies; the numbers just compress. The formula guide has the shape and the reasoning.
Making it stick
Learning is behaviour change. If your driving is the same next week, nothing here was learned, however much sense it made. The difficulty is not that any of this is hard — it is that none of it is intuitive. Braking earlier when you know you could make the corner from later is not something the brain volunteers to do, and the system will drift back to its old state unless you push against it deliberately.
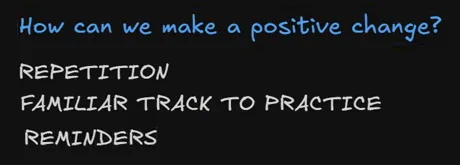
Three things the group settled on, which I think are the right three. Repetition: the same corner, many times, until the earlier point is the default rather than the exception. A familiar track: pick one you already know well, same car, same setup, so that the braking is the only thing changing and you can attribute any gain to it. And reminders: when you have a long straight and some spare attention, use it to ask which phase of the corner ahead matters most, because on most corners the answer is the exit, and on the few where the next corner is close enough that entry speed really does matter, you want to have decided that in advance rather than discovered it at the apex.
One member suggested something that is worth more than any of the above if you have the option: practise with someone. Park the car, share your screen, and let another driver look at the corner you cannot see. The things you do not notice are, by definition, the things you will never fix alone.
The complete braking workshop these drawings and questions come from is available to members as Build Your Own Braking Style inside the Academy. And if you have done the steps and the braking point still will not move, the thing you cannot see is almost certainly visible in a brake trace next to a faster one — which is exactly what a lap review is for.
Braking points FAQ
What is a braking point in sim racing?
The place on track where you begin applying the brake for a corner. A braking reference, or marker, is the fixed thing you use to find it: a board, a kerb, a change in the tarmac. The reference is fixed; the braking point is a decision that depends on your entry speed, peak pressure, downshift timing and tyre temperature. Point vs reference.
How do you brake later in sim racing without missing the apex?
By not moving the marker first. Start comfortably early, get the exit right, then make your straight-line deceleration more efficient: no throttle-brake overlap, a quick build to peak pressure, no time deep in ABS or micro-locking, early first downshifts. The braking zone gets shorter, and only then do you move the marker, in small steps, keeping each one only if the exit stays clean. The sequence.
Does braking later make you faster?
Only if the exit stays at least as good. On most corners the exit is far longer than the entry, so a later braking point that costs a clean, early throttle application is a net loss every time. The test for any braking change is the delta through the following straight, not the braking zone. Why later is not automatically faster.
How do you find the ABS threshold when braking?
In practice, with an input overlay or the dash light that shows ABS activation: brake until it starts triggering and note the pressure. That is your threshold in that car, and it moves with tyre temperature. Aim to brake just under it, or dip into the lower edge of the window, never park at the top. Without ABS the equivalent is a micro-lock: a brief change in force feedback and sound, or a wheel that stops for a single frame in the replay. Finding the threshold.
How fast should you reach peak brake pressure?
Quickly, but not as a vertical stab. Time spent below peak is distance wasted, so the build should be decisive; a spike to 100% gives you no control and, in a GT car, no time for the load to reach the front tyres. Fast GT3 drivers rise with purpose and slightly eased, then sit just under the ABS window. Compare the length of your build to a faster driver's in the same corner. Peak pressure.
When should you downshift under braking?
The first downshifts as soon as the car will accept them, because engine braking only helps once the lower gear is engaged and modern GT cars protect against over-revving. The last downshift is timed, usually a little before turn-in, because it always shifts the balance towards oversteer and landing it while turning adds a rotation input you may not want. Downshift timing.
How do you know if you are braking too late?
The signals are all downstream: a missed apex or extra steering to make it, ABS still cycling into turn-in, a later throttle point, a correction on the exit, a worse delta at the end of the following straight, or a reference lap that re-passes you before the next corner. Two or more of those and the marker has gone too far. The signals.
Is it ever faster to brake earlier?
Often. An earlier braking point with modest pressure keeps the tyre in its temperature window, protects the exit and is repeatable in a way a late, hard braking point is not. One member’s reading of a 10K driver’s onboard footage was exactly that: early braking, rarely above around 60% pressure, apparently to keep the tyre in its window. The time lost on a slightly early entry is small; the time available on the exit and the straight is much larger. When earlier is faster.
What is throttle-brake overlap?
Applying the brake before the throttle has fully released, so for a moment the engine is fighting the brakes and the tyre is transmitting two opposing loads. It heats the tyre for no gain. The fix is to lift, count to one, then brake; the brief coast costs far less than the overlap. In GT cars no fast driver does it; in formula cars the cost is smaller but it is still worth removing. Overlap.
This guide is part of the free library at GitGud Racing Academy — an online sim racing academy built around weekly lap reviews, structured courses, drills and training tools.
Train this the right way
Reading is step one. Build it into muscle memory with structured, car-specific courses and personal lap reviews from a coach — inside the Academy.
Join the Academy · $39.99/mo incl. VAT