How to Improve Your Race Pace Without Overdriving
There is a specific kind of frustrating race, and if you have had it you will recognise it immediately. You qualify P4. You know the lap time is real because you just did it twice. The lights go out, and by the end of lap three you are P9, defending, with a train behind you and nothing in front. Nothing broke. You did not spin. You just… never got going.
That race is not a pace problem. You proved the pace an hour earlier. It is a race pace problem: how long it takes you to reach the speed you already have, and how much of it you keep for the rest of the stint. This page is the framework I use for both, taken from a live Academy workshop on race management, with the drawings the group worked through and the questions they asked while we did it. It will not teach you to overtake or defend — that is racecraft, and it is a different subject. It is about the decision most drivers never realise they are making, and about how to measure whether you made it well.
What is race pace in sim racing?
Race pace is the lap time you can repeat, stint after stint, with other cars around you and without putting the car at risk. It sits below qualifying pace, because qualifying is a single lap on prepared tyres in clear air, and above management pace, which is what you drive when you are deliberately saving fuel or tyres. Judge it on three things, not one: your fastest lap shows what is possible, your repeatable clean-lap pace shows what you can hold, and your whole-stint time shows what you actually did with it, opening laps, mistakes and traffic included. Most drivers lose more time getting to their race pace than they lose from not having enough of it.
Fastest lap, repeatable pace and stint performance
Three different numbers get collapsed into the word "pace", and they answer different questions.
| Measure | What it tells you | What it hides |
|---|---|---|
| Fastest lap | What you and the car can do once, when everything lines up | How often you can do it, and how long it took to get there |
| Repeatable pace | The lap time you can hold on clean laps, without mistakes | The laps that were not clean: the start, the errors, the traffic |
| Whole-stint performance | The total time across the stint, everything included | Where the time went — you have to break it down to see that |
The race result comes from the third. Most drivers judge themselves on the first. This page is about closing the gap between them, and the measurement section shows how to break a stint down so you can see where the time went.
There is a second distinction, about how you drive rather than how you measure. Watch any professional series with team radio and you will hear the same vocabulary all afternoon. Now I'm pushing. Now I'm saving. Manage the gap. Those drivers are telling you there is more speed in the car than they are currently using, and that they are choosing not to use it. Pace is not one number. It is a dial, and the skill is knowing which position it should be in:
- Qualifying pace is a one-lap maximum: prepared tyres, clear track, and a willingness to accept risk you would never accept on lap two of a race, because the downside is a deleted lap rather than a wrecked car.
- Race pace is what you can hold lap after lap without the mistakes. One driver in the workshop put it better than I did: it is the pace you can hammer in, lap by lap, for thirty minutes, without a spin and without an off-track. That is your benchmark, and everything else is measured against it.
- Management pace is slower on purpose, and for a reason: fuel, tyres, dirty air, or a gap you have decided is worth protecting. It is not "being consistent." Being consistent is what race pace already is.
That last confusion costs people whole races. Plenty of drivers believe their management pace is their race pace, because it is the pace at which their lap times look tidy. It is not. If you can do it all day without ever feeling the car move underneath you, you are managing, and you are giving away several tenths a lap to somebody who is not.
None of this is about being fast in absolute terms. Every percentage on this page is a percentage of your own maximum. If you are two seconds off the top split, your 100% is two seconds off the top split, and that is completely fine — the framework works the same way. You are competing with the version of yourself that took four laps to wake up.
Fast in qualifying, slow in the race: find the cause first
"Slow in the race" covers several different problems, and the fix for one does nothing for the others. Take the lap times from a recent race and find the row that matches.
| What you see | Likely cause | How to check | Where it is covered |
|---|---|---|---|
| The first two or three laps are well off your pace, then you are fine | Building up to your pace one mode at a time | Compare laps 1–3 with your settled clean laps | The staircase, cold tyres |
| You lose one position early, then a queue forms behind you | Slow opening laps, which invite the next attack | Note the lap on which each position was lost | Opening laps, starting position |
| Clean laps are on pace, but one or two mistakes cost you the gain | Overdriving: staying at your maximum for longer than you can hold it | Add up the time lost on mistake laps | Why nobody stays in M4 |
| Clean laps scatter by several tenths with no pattern | A consistency problem rather than a race pace one | The spread of your clean laps | Inconsistent lap times |
| You are quick early in the stint and fade later | Tyre temperature or wear, or concentration | Compare clean laps from the first and second half of the stint | Later in the stint, tyre management |
| You are quick alone and slow with cars around you | Hidden references, or not knowing the track well enough to drive it by other cues | Compare laps in traffic with laps in clear air | Reference points |
| Your practice pace never shows up in the race | Practice was single laps on light fuel and fresh tyres | Run one full stint on race fuel in practice and compare | Practising effectively |
The rest of the page follows the same split. First the opening laps: why the drop happens, the four pace modes that describe it, how your starting position changes the plan and the cold-tyre drill. Then holding your pace later in the stint. Then how to measure a stint and which comparisons are fair.
The opening laps: why you are fast in qualifying and slow at the start
This is the part almost nobody has been told, so let me put it as plainly as I can. In qualifying you do an out lap, you warm the tyres, and then you push. You are not scared of the first flying lap, because you have already accepted that this is the moment you go for it. Two laps later you have a time that proves what the car and the driver can do together. (How to do that out lap and those two laps well is its own subject, and how to qualify faster covers it; this page starts where that one ends.)
Then the race starts, and something changes. The tyres are actually warmer on the grid than they were leaving the pit lane in qualifying. The car is the same. The corners are the same. And yet the first two laps are three or four tenths slower than the lap you just set, for no mechanical reason at all.
I have this problem myself, and I said so in the workshop. I qualify well — top five, sometimes top three — and then lose positions in the first two laps, because I am hesitant. I tell myself the tyres are cold and I might spin. Meanwhile I am doing much faster laps in qualifying, on much the same tyre temperature. So the tyres are not most of the reason. They are below the window my practice references were set in, and lap one deserves some margin for that — but some margin is not three laps of it. The rest of the gap is that I have not decided, in advance, that lap one is a lap I intend to be fast on.
There is a second cost to this that is easy to miss, and it is bigger than the lap time. When you are slower than you should be in the opening laps, the car behind does not simply pass you and disappear. It passes you, and the car behind that one watches it happen and decides you are soft. So you do not lose one position. You lose one position and you acquire a queue. Every driver in it has just been shown that the move works.

So the question to carry into every race is not "how fast am I?" It is how quickly am I reaching my fastest pace? Two laps? Three? Four? One corner? The earlier you get there, the fewer fights you have, and the more likely you are to be pulling a gap rather than defending one.
The four pace modes
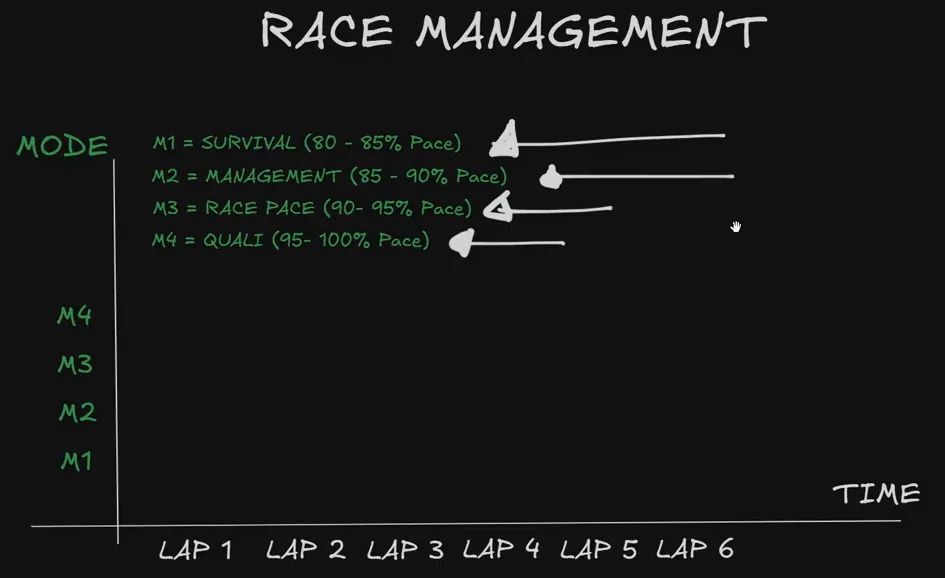
To talk about any of this concretely you need names for the settings on the dial. I use four. They are not a scientific instrument — they are a way of making an invisible decision visible, so you can catch yourself making it badly.
| Mode | Name | Roughly | What it is for |
|---|---|---|---|
| M1 | Survival | 80–85% | Getting the car to the finish line. Turns one, two and three. Anywhere the track in front of you is chaos. |
| M2 | Management | 85–90% | Deliberately slower for a reason: fuel, tyres, dirty air, or a gap you have decided is safe. |
| M3 | Race pace | 90–95% | Repeatable but still on edge. What you train for in practice. The pace you can hold for a stint. |
| M4 | Qualifying pace | 95–100% | Everything you have: the qualifying lap that counts, not the banker before it. Fast, and correspondingly likely to tip over 100% and cost you. |
Two clarifications before we use them, because both came up in the room.
First: the percentages are illustrative. Nobody drives at 90.0% on command. They exist so you can say "I was in M3 through that section and I dropped to M2 for the hairpin" and have it mean something. Second, and more important: M1 is not a skill level. It is a mode any driver can choose in any lap of any race. That distinction matters because the word survival also describes an early stage of learning to drive a car at all, and that is a different idea entirely — if what you actually want to know is which stage of development you are in, the five stages of sim racing progression is the page for that. A 6K driver still uses M1 into turn one. They are just there for eight seconds instead of two laps.
The mistake: climbing to race pace one mode at a time
Here is what I used to do, and what the majority of drivers between roughly 1,000 and 3,000 iRating still do. Lap one in M1, because lap one is dangerous. Lap two, feeling better, move up to M2. Lap three, tyres in, go to M3. Maybe an M4 lap somewhere later if there is a gap to close. Then settle back into M3 and run the race out.
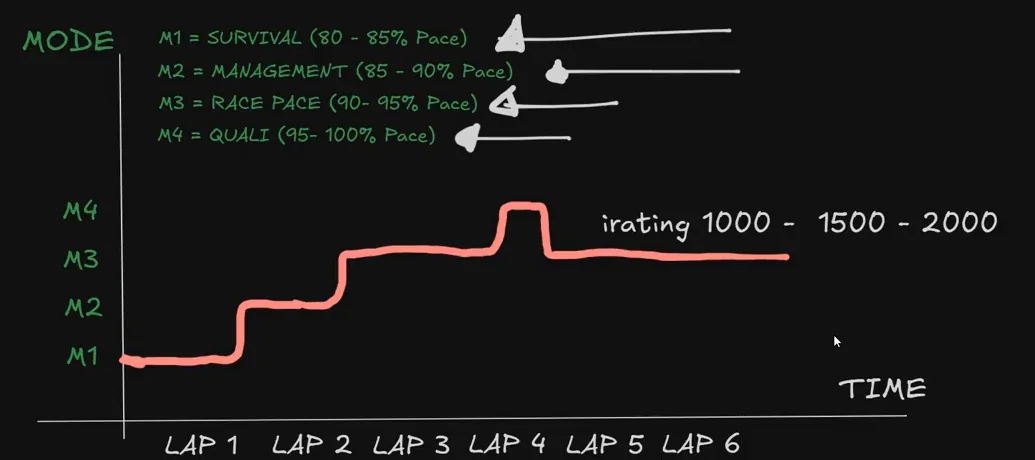
It looks sensible. It is what a careful person does. And it was not good enough, which is why I went looking at what the drivers who were beating me were doing differently.
Understand what the staircase actually costs. It is not only the lap time on laps one to three, although that is real. It is that everyone around you is doing their racing during exactly the laps you have decided to spend warming up. The field is at its most compressed, the positions are at their most available, and you have chosen that window to be at 85% of yourself. By the time you arrive at your actual pace, the race has already sorted itself out around you, and you are behind three cars you are quicker than, which is the single most expensive place to be.
One member described the same thing from inside a 1,800-rated split, and it matched exactly: the top two are gone within four laps and seven seconds up the road, and everyone else has clumped into little knots of cars who cannot escape each other, all slowing each other down. Those knots are made of drivers who did not access their pace early enough to avoid being in one.
What faster drivers do instead
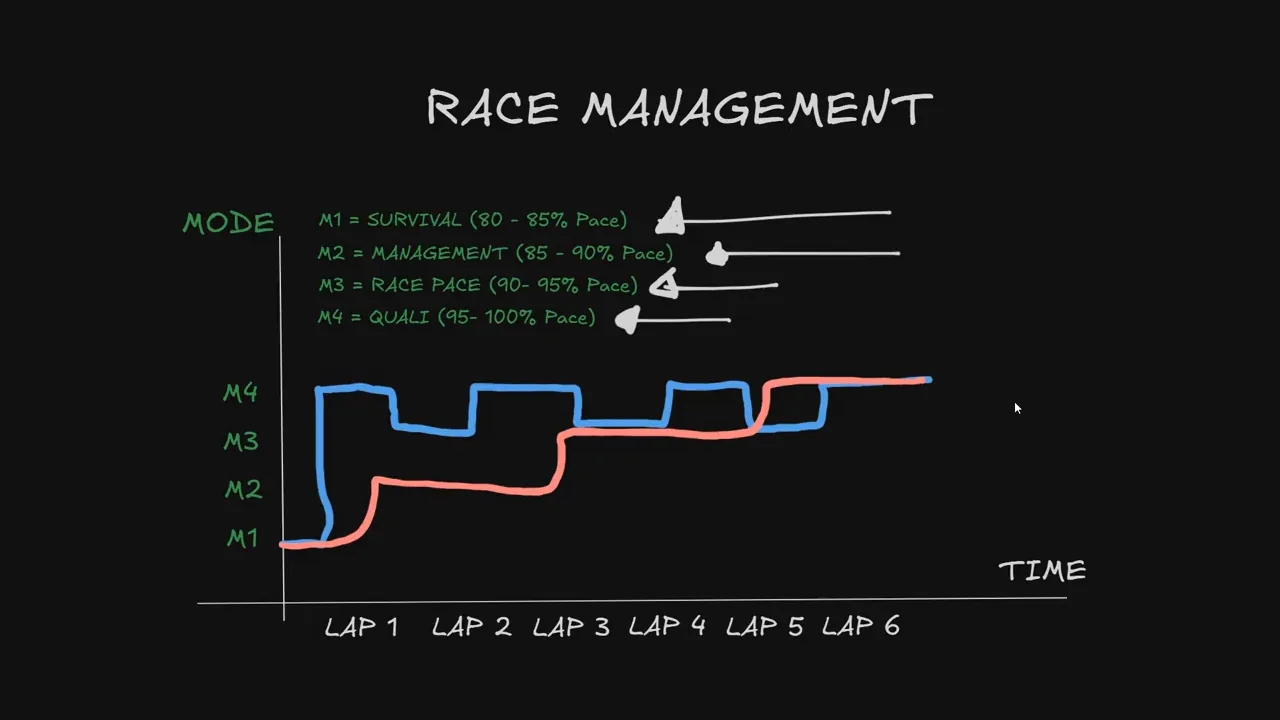
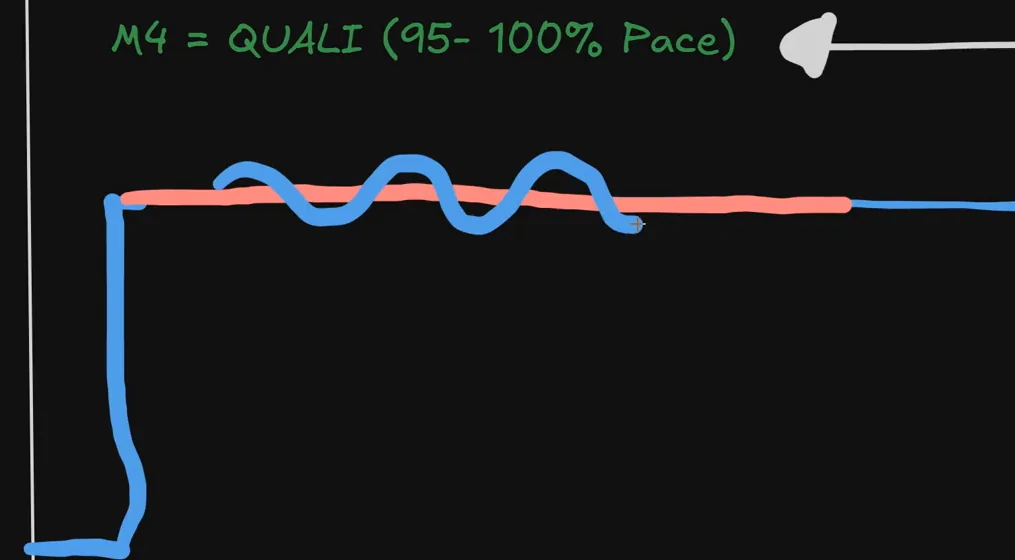
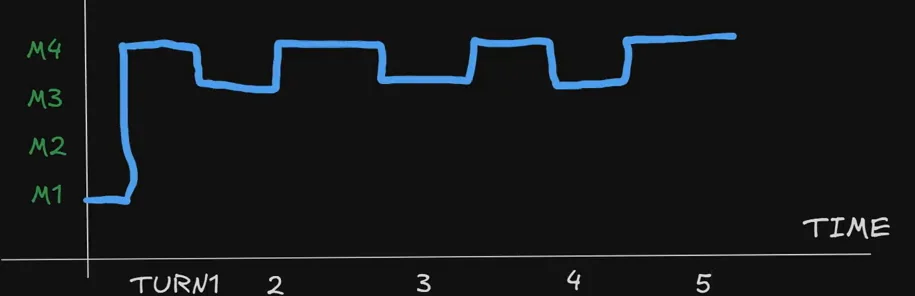
The drivers at 5K and above do something that looks reckless written down and is not. They also start in M1, because everybody starts in M1 — it does not matter whether you qualified P1 or P20, if you crash at turn one none of the rest of it happened. But then, very quickly, sometimes before turn two, they go from M1 to M4. Not M2. Not M3. Straight to the top.
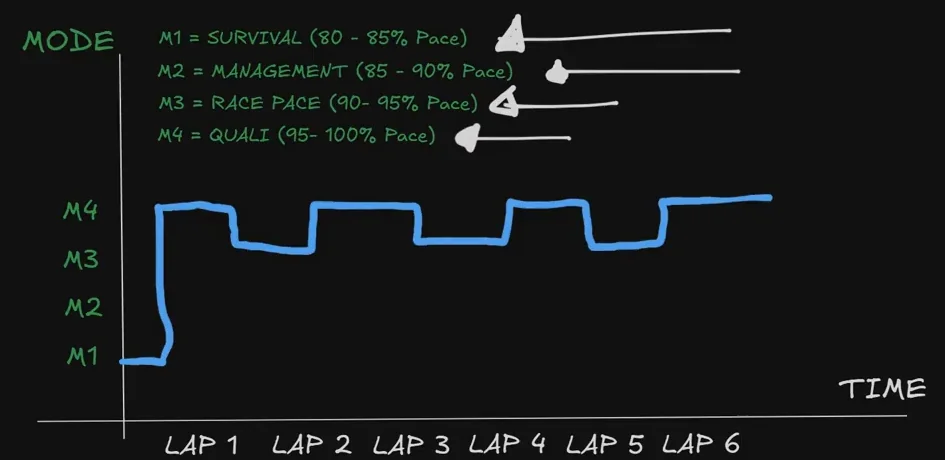
Then they oscillate. M4, M3, M4, M3, for the rest of the race. Look at the blue line and notice what is not there: M2 essentially does not exist unless a gap has already been built. And M3 is not a rest stop on the way up — it is a tool used deliberately, to reset after a scrappy corner, to take a lower-reward corner more cheaply, or to deal with fatigue in a longer race.
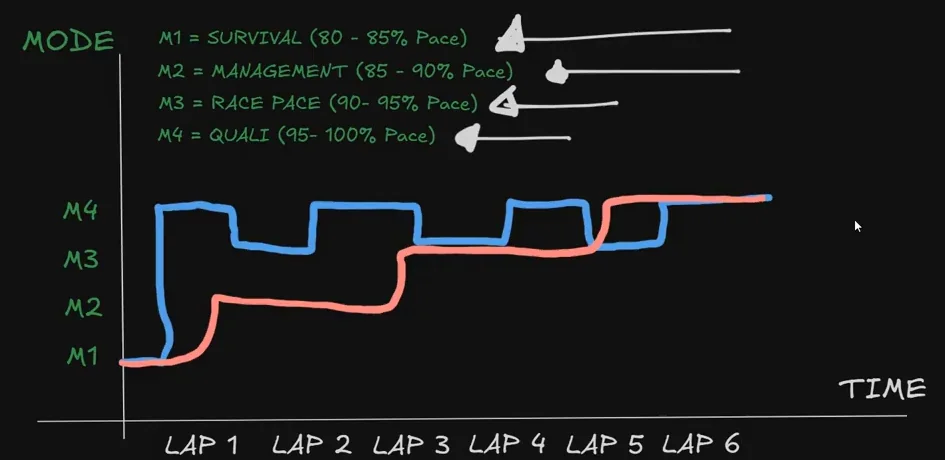
That last point is the one I most want to land, because the room wanted to argue it, reasonably, on the grounds that this is really just about raw pace. It is not. Draw both lines for the same driver. Same car, same track, same maximum. The blue version is ahead by lap two, and stays ahead, purely because of when they decided to use what they already had.
At the very top the shape gets more extreme still. Esports-level drivers spend more time in M4 than in M3, which they can do because their M4 is more controlled than most people's M3 — but the pattern is the same pattern, just further along it.
There is a driver on our own server who has won something like forty-five of their last forty-seven races, in lobbies with 6K and 7K drivers in them, and the members who race against them describe it identically every time: pole by two tenths, which is nothing, and then a gap from lap one. Two tenths of qualifying advantage does not produce a five-second lead by lap five. Accessing your pace immediately, while everyone else is still building up to theirs, does.
It does not matter if your peak pace is three seconds off the alien pace. You are comparing against yourself here. Heat up your pace as quickly as you can.
Why nobody just stays in M4
The obvious question, and one of the members asked it immediately: if M4 is the fastest, why does anybody ever leave it? Why do even esports drivers drop to M3?
The answer is arithmetic, and it is worth doing on paper once because it is much more persuasive than the feeling.
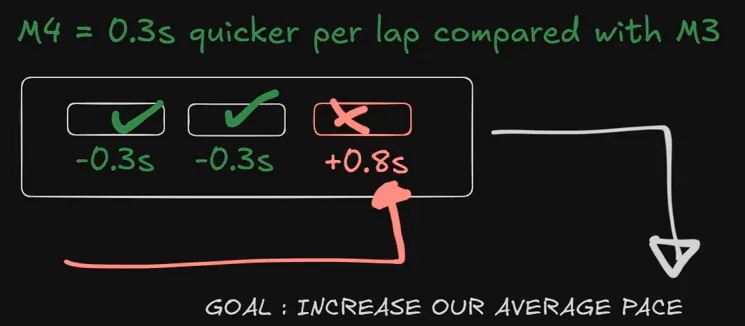
Say M4 is worth about three tenths a lap over M3. Run it twice and you have gained six tenths. Then make one mistake — a wide exit, a lock-up, a corrected slide — and lose eight. You have driven at your absolute limit for two laps and finished worse off than if you had not bothered. That is the whole reason M3 exists, and it is what overdriving really is: not one big slide, but staying at the limit for longer than your attention can hold it.
The reason the mistake is close to inevitable is not the car. It is attention. Holding genuine 100% concentration is difficult for everybody, at every rating, and if you sit in M4 long enough the lapse arrives. As one member put it while we were drawing this, the fast drivers have to take a lap off because they are on the limit on every single lap, and after four of those you are one per cent off on the brake or one per cent off on the steering and you lose the eight tenths.
So the target is not maximum pace. It is maximum average pace, which is a different thing and is optimised differently. And note what that means for the staircase driver: reaching a 2:01.5 on lap two instead of lap three raises your average for the whole race, without you ever having driven a faster lap than you already could.

Opening laps: your starting position changes the plan
None of this is a formula, and where you start changes it more than anything else. One member asked, on the recording, that whoever reads this later is told plainly: it is not the bible, it is situational. Consider yourself told. We worked through three cases in the workshop — back of the grid, mid-pack, and the front row — and the group's answers were better than my prepared ones.
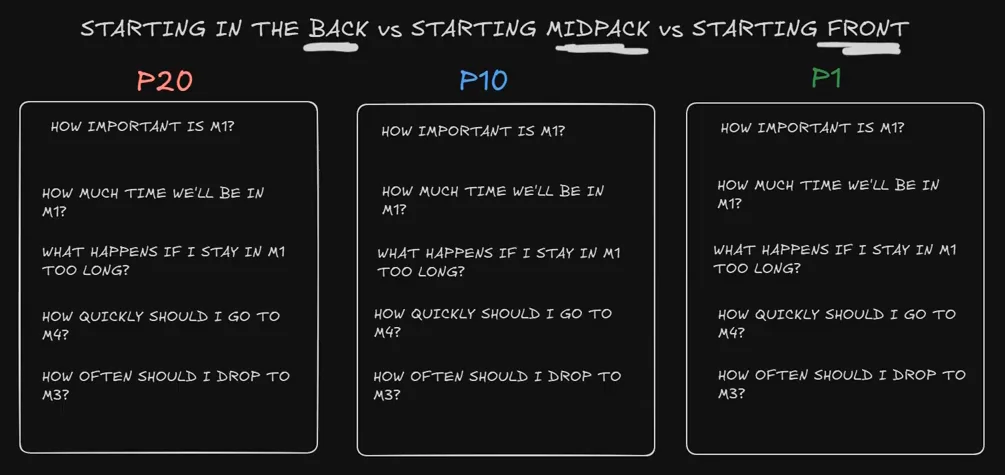
Starting near the front
The cheapest place to reach M4, because there is nobody in front of you and the air is clean. It is also the place where staying in M1 too long costs the most: you had an advantage, you did not convert it, and within two or three laps you are eighth. In a rolling start with GT3s, as one member put it, P1 into turn one is a game between you and your own right foot — you generally only lose it by making a mistake yourself. Brake fractionally early out of caution and somebody will simply be on the inside. A formula driver in the room added the correction straight away, and it stands: a standing start, or a long run to turn one with a slipstream, is a different proposition, and the advantage of the front row is much smaller there.
And survival still applies. You can be perfectly correct, turning in to your apex, and still need to take avoiding action because somebody behind has arrived at the corner with a plan and no brakes.
Starting mid-pack
The consensus in the room, and I agree with it, was that this is the hardest place to be. You have five cars ahead and five behind, all of whom can reach you. The qualifying time distribution is densest in the middle, so the drivers around you genuinely have your pace. You need M1 because the risk is real, and you cannot afford much of it because standing still here means being swallowed from both directions.
Starting at the back
The one place you can afford a longer M1, and often should. From the very back there is no pressure from behind, so you can leave a second of margin, let the first-lap chaos resolve, and pick up positions from other people's incidents without spending anything. The cost is that if you stay there too long you simply remain at the back — in a twenty-minute race there is not enough time left to recover the ground.
What matters more than any of the three answers is that you have decided in advance which one you are running. As one member said, quoting a colleague: the plan is not important, the planning is. The plan you made will not survive lap one. Having made one means you can build a new one quickly, at a moment when most of your attention is already spent on driving.
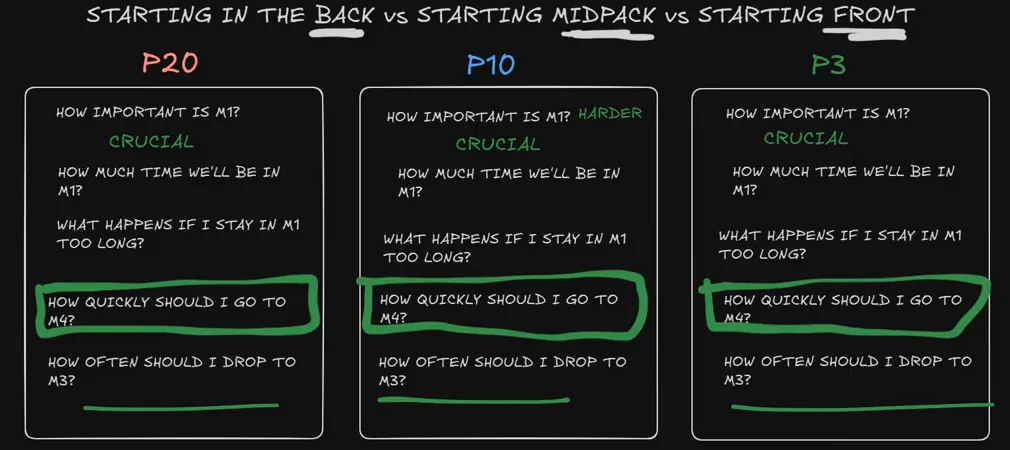
None of this is permission to be aggressive in turn one. M1 is about space and survival, not lap time, and it is never skipped; the argument is about how long you stay there after the danger has passed. How to survive the first lap when it goes wrong is covered in how to avoid crashes. And the reason so many drivers pick the over-cautious option in all three columns is usually not caution at all — it is the iRating trap, where the fear of losing points quietly makes every decision for you. One member said it flatly in the workshop: if you are making decisions based on fear of losing rating, almost none of the rest of this matters.
Opening laps: the cold-tyre problem nobody practises
There is a real, physical reason lap one is different, and it is worth separating from the psychological one so you know how much of each you are dealing with.
Tyres are cold at the start of a race, and grip is lower. That is true. But here is the detail that changes how you should practise, and it came from a member reading the tyre screen in a GT3: leaving the pit lane in a practice session the temperature readout sits somewhere in the thirties, while on the grid at the start of a race it is around forty-five degrees. So every time you practise your first push lap by leaving the pits and going for it, you are practising a colder, more difficult version of the problem than the one you will actually face — and you are teaching yourself that the first lap is treacherous. (Those are one car's numbers from one member's screen; the principle travels, the figures do not.)
Which is also the place to be precise about what "go to M4 on lap one" means, because the tyre management guide tells you to give the first lap more margin and lists driving your qualifying pace on cold tyres as one of the ways to ruin a stint — and it is right. M4 is the maximum the car has available on the tyres it has right now. On a cold tyre that is not your qualifying lap time, and trying to drive your qualifying lap time on a cold tyre is exactly how you overheat the surface and lose the stint. The decision this page is about is to use everything that is available immediately, rather than waiting three laps to find out how much there was. It is not to pretend more is available than there is.
Worse, most of us never practise it at all. A member admitted the exact habit in the workshop, and I have the same one: in practice you give the car two or three laps to come to temperature before you start pushing, because there is no point setting a slow time. Which means the one thing you never rehearse is the thing the race opens with.
There is also a trap in the other direction. Following a faster car to get temperature into the tyres can warm them the wrong way — you overheat the outer layer, it starts to slide, and now you have less grip than you started with. Cold tyres and overheated tyres are different problems with a similar-feeling symptom; tyre management covers telling them apart and what to do about each.
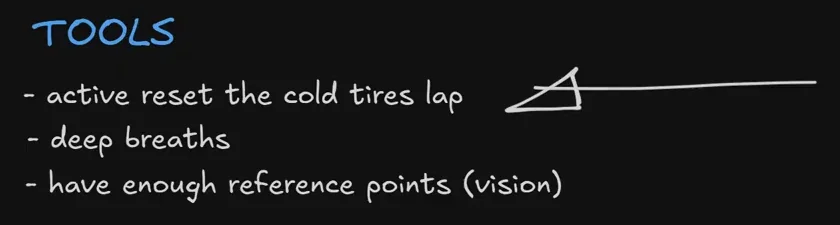
Drill: the cold-tyre reset
Take ten minutes out of a one-hour practice session. Not more.
- Leave the pits and drive one clean, unhurried lap to bring the tyres to roughly race-start temperature. Do not skip this — pushing straight out of the pit box rehearses the wrong conditions.
- Now drive one lap as though it is lap one of the race: go to your pace immediately, in the first sector, on purpose.
- Reset to pits. Repeat.
- Do five of these and compare them. You are looking for two things: how consistent your braking points and throttle application are on that first push lap, and where the grip limit actually is when the tyres are not fully in.
The point is not the lap time. It is that you arrive at the next race already knowing what the car does under those conditions, so the switch from M1 to M3 is a rehearsed move rather than an experiment. If you want the comparison to be objective rather than a feeling, record the laps and overlay them — reading telemetry will show you the braking consistency far more honestly than your memory will.
This is one of the genuine advantages of a simulator over a real car, and it is worth being deliberate about exploiting it. Track conditions in a sim are repeatable to a degree that reality never offers. You can find the grip limit of a specific corner on cold tyres, ten times in a row, and then simply know it. You are not fishing for grip in the race — you are repeating something you have already done. And if you get it wrong, you reset to the pits, which is not an option available at a real circuit.
Two more things that make the switch easier
The cold-tyre drill is the one with the biggest effect. Two smaller ones are worth knowing about.
Your heart rate is higher than you think
I raced with a heart-rate monitor on out of curiosity and found I was sitting around 170 beats per minute. That is a hard physical effort, and I did not feel nervous at all — which is exactly the problem. So I started taking two deliberate deep breaths on the longest straight, every lap, and on the formation lap.
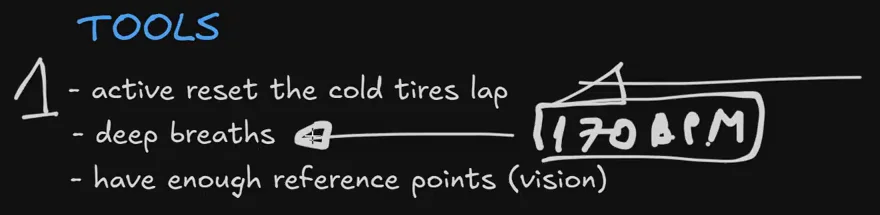
I will be honest about what this does and does not do. It did not make me faster in any measurable way, and I am not going to claim it did. It made the pressure of racing other people easier to sit with, which is a real thing when the whole task is committing early rather than waiting for permission.
Reference points, when the usual ones are hidden
Confidence is what lets you push early, and confidence is mostly information. The specific failure worth preparing for is a braking board hidden behind the car alongside you, and the habit that fixes it — more than one braking reference per corner — is already covered in how to avoid crashes, so I will not repeat it here. The point for this page is narrower: if switching modes feels impossible when there are cars around you, the problem may not be bravery at all. It may be that you cannot see, or that you do not know the track well enough to see it quickly, and how to learn a track is where that gets fixed.
Later in the stint: holding your pace without overdriving
Getting to your pace early is half of it. The rest of the stint has a different risk: not hesitation but drift. You push past the limit because you are tired or because the tyres have changed under you, or you settle into management pace without ever having decided to. The M4 and M3 rhythm from the blue line is the tool, and two refinements from the workshop make it work for a whole stint.
Small corrections, not big lurches
Zoom in on an esports driver's M4 and it is not a flat line either — it is a constant small correction, corner by corner. Drove that corner at 101% and went over the limit? Next lap, take that one corner slightly gentler. The better the driver, the smaller and more frequent those adjustments are. Big lurches between modes are a beginner's version of the same instinct.
Awareness is the trigger
The keyword that makes any of this possible is the one a member supplied, and I wrote it on the board because it was better than anything I had: awareness. You drop out of M4 when you notice your concentration going or notice that you are pushing too hard — not after the mistake has already happened.

When the car changes under you
The car at the end of a stint is not the car you started it in. Fuel burning off makes it lighter; tyres that have gone past their window give less grip and slide more. How much each matters, and when, depends on the car, the track and the sim. What does not change is the trap: driving your early-stint lap on a late-stint tyre is overdriving too, even if it does not feel like pushing. If your clean laps fade as the stint goes on, tyre management covers reading what the tyres are doing and what to change.
The same idea, one corner at a time
The charts above are drawn lap by lap because it is easier to see that way. In a real race the dial moves far more often than that, and once the lap-level version is working it is worth zooming in.
A member gave the perfect example. They know they are prone to spinning at one particular corner at Sebring, and they lose confidence there. That is useful knowledge, not a weakness — it means the plan for that lap can be M1 to M3 through the opening corners, then a deliberate drop for that one corner, then back up. You are not backing off because you lost your nerve. You are backing off because you decided to, in advance, at the one place where the risk is genuinely worse than the reward.
Knowing where your own limit is, corner by corner, is the prerequisite for all of this. If you cannot feel where 100% is, you cannot choose 90% either — finding the grip limit is the piece of work that has to come first.
Measure the whole stint, not your fastest lap
If you take one measurement away from this page, take this one. Most drivers assess a race by its fastest lap, and some more thoughtful ones by consistency. Both miss what this framework improves. Your fastest lap does not move when you fix the staircase — the 2:01.5 was always there. What moves is how many laps you spend at it. Break a stint into four numbers instead:
- Clean-lap pace: the average of the laps with no mistake, no traffic and no part of the start in them. This is your repeatable race pace.
- Variation: how far apart those clean laps are. That is consistency, the question why your lap times are inconsistent exists to answer. It is worth watching, but you can be beautifully consistent at 90% for a whole race.
- Trend: whether the clean laps get quicker or slower as the stint goes on.
- Time lost: what each lap that was not clean cost against your clean-lap pace, sorted into opening laps, mistakes and traffic.
A worked example
The numbers below are invented to show the method. They are not a real result, a target or a typical lap time. One ten-lap stint:
| Lap | Time | What happened | Counted as | vs 2:02.0 |
|---|---|---|---|---|
| 1 | 2:03.6 | Start, M1 into turn one, then building up | Opening | +1.6 |
| 2 | 2:02.7 | Still building up | Opening | +0.7 |
| 3 | 2:02.3 | Nearly there | Opening | +0.3 |
| 4 | 2:01.8 | — | Clean | −0.2 |
| 5 | 2:02.0 | — | Clean | 0.0 |
| 6 | 2:03.2 | Wide exit | Mistake | +1.2 |
| 7 | 2:01.9 | — | Clean | −0.1 |
| 8 | 2:02.9 | Held up by a slower car | Traffic | +0.9 |
| 9 | 2:02.1 | — | Clean | +0.1 |
| 10 | 2:02.2 | — | Clean | +0.2 |
- Fastest lap: 2:01.8, on lap 4. It says nothing about the rest of the table.
- Clean-lap pace: laps 4, 5, 7, 9 and 10 average 2:02.0.
- Variation: 0.4 seconds between the quickest and the slowest clean lap.
- Trend: the clean laps up to lap 7 average 2:01.9; laps 9 and 10 average 2:02.15, a quarter of a second slower.
- Time lost: 2.6 seconds in the opening laps, 1.2 to the mistake and 0.9 to traffic: 4.7 seconds against ten laps at clean-lap pace.
Read it in that order. In this example the biggest loss is the opening laps, which a fastest-lap column would never show and which the first half of this page is about. Some of lap one is the start itself and cannot be recovered, but not 2.6 seconds of it. The mistake comes second, and it is the case for dropping to M3 before it happens. The late trend is small, but it is the one to watch in a longer race: in most cars fuel burn alone would make the later laps slightly quicker, so a slowing trend points at the tyres or at you. And the variation is fine — this driver does not have a consistency problem, so working on consistency would not have found the 4.7 seconds.
Track the clean-lap pace and the opening-lap loss for one track across several races. Those two numbers are the honest scoreboard for everything on this page.

What makes two stints comparable
Lap times only compare cleanly when the car and the track were in the same state. Four things move the numbers without you driving any differently.
| Factor | How it skews the comparison | What to do |
|---|---|---|
| Fuel | A full tank is heavier, and usually slower, than the light car late in a stint or on a low-fuel practice run | Compare laps at similar fuel; practise at least one stint on race fuel |
| Tyre state | Cold tyres at the start, tyres in their window mid-stint and worn or overheated tyres later all give different lap times | Compare the same part of the stint; treat lap one as its own category |
| Traffic | Dirty air, being held up, or a fight for position costs time that is not a pace problem | Leave those laps out of clean-lap pace, but count them in time lost |
| Conditions | Track temperature and, in sims that model them, rubber on the line, time of day and weather change the grip available | Compare within one session, or between sessions in similar conditions |
The same logic applies to qualifying. Your qualifying lap is often set on lighter fuel, depending on the series, and on fresh tyres in clear air, so it is the ceiling for a stint rather than the target for every lap of it — how to qualify faster covers getting that lap. Lap one needs its own comparison too: part of it is the start and turn one, which nobody drives at full pace, so compare your lap one with your lap one at the same track, not with your clean-lap pace.
Practising on race fuel fixes the most common mismatch, because it makes the practice number mean something on race day; how to practise effectively shows where a race-conditions session fits in your week.
What drivers asked in the workshop
Three questions came up that are worth reproducing, because they are the ones I get most often afterwards.
"I do not have four modes. I am either pushing or I am not."
This is the most honest question of the session and it has a concrete answer. If you only have two settings, build the middle ones mechanically rather than by feel. Take a track you know. If your fast lap brakes at the 100 metre board, brake at the 120 and use less pressure, and drive fifteen laps like that. Do not try to feel 90% — produce it, by changing an input you can measure, and let the feeling attach itself afterwards.
The variables to move are brake application and throttle timing, not steering. Steering is how you place the car; the pace dial lives in how much longitudinal load you are asking for and when. If you are early in your development, do not worry about having the middle modes yet. Know that they exist and that you are building towards them. Building them is the kind of work a coach can watch you do in a live coaching session.
"How do I judge how good the car is in that moment?"
Partly by rehearsal, which is what the cold-tyre drill is for. Partly by picking your test point: the same member described using a heavy braking zone — a hairpin, somewhere with a well-defined braking area — on the out lap in practice, deliberately, to test the grip and their own confidence before committing. That is a better instinct than it sounds, and it generalises. Pick the corner where the information is cheapest to gather and gather it there.
"Is not all of this just raw pace?"
Partly, and the room was right to push on it. Raw pace matters enormously and nothing here substitutes for it. But the distinction survives the objection: two drivers with identical maximum pace will finish in different places if one of them takes four laps to use it. That is not a pace difference. That is a decision, and it is available to you tonight without getting any faster at all.
If what you actually want is more raw pace underneath the decision, that is a different project with its own sequence — how to get better at sim racing lays it out, and the twelve underlying skills are in the driving techniques guide.
Where to start
Do not try to implement the whole framework at once. Pick the first item and let it run for a week.
- Decide, before the race starts, when you intend to be at your pace. Not "as soon as I feel comfortable." A lap number, chosen in advance, adjusted for where you qualified.
- Spend ten minutes of one practice session on cold-tyre resets. One warm-up lap, one race-start lap, reset, repeat five times.
- Run one practice stint on race fuel, so the number you take into the race is a race number.
- Break your next race into the four stint numbers — clean-lap pace, variation, trend and time lost — and track clean-lap pace and opening-lap loss for one track across three races, rather than your fastest lap.
- Add the awareness check. When you notice concentration slipping or that you are reaching, take one M3 lap on purpose, before it costs you eight tenths.
Something worth saying at the end, because it applied to everyone in the room including me: you will forget this. Not because it is difficult, but because it is not intuitive, and the natural state of any system is to go back to what it was doing before. Braking earlier on purpose feels wrong. Pushing on lap one feels reckless. Both of those feelings are the thing being corrected, and they do not go away just because you agreed with a diagram once.
The full race management workshop this framework comes from, including the whole group discussion, is available to members as the Race Management workshop inside the Academy. And if the honest problem is that you are not sure whether your qualifying pace is real or whether the car is simply better than you are getting out of it, that is the question a lap review answers directly — send us a representative lap and we will tell you which one it is.
Sim racing race pace FAQ
What is race pace in sim racing?
The lap time you can repeat, stint after stint, with other cars around you and without putting the car at risk. It sits below qualifying pace (one prepared lap in clear air) and above management pace (deliberately slower to save fuel, tyres or a gap). Judge it on three numbers: your fastest lap (what is possible), your repeatable clean-lap pace (what you can hold) and your whole-stint time (what you actually did with it). The three, separated.
Why am I slower in races than in qualifying?
Cold tyres explain some of it, but not three laps of it: on the grid the tyres are warmer than they were leaving the pits for your qualifying out lap, though still below the window your practice references were set in, so lap one deserves some margin. The rest is a decision you have not made in advance: that lap one is a lap you intend to be fast on. Without it you build up to your pace one mode at a time and lose the positions while you do it. Why the drop happens. If your pace falls away later in the stint instead, the cause is different: the diagnostic table.
How quickly should you reach your race pace?
As soon as the first corners are behind you. Everyone starts in survival mode, but drivers at 5K and above go from there straight to their maximum within the first lap, then alternate between maximum and race pace. Drivers who climb one mode per lap arrive at their speed after the race has already sorted itself out around them. What faster drivers do.
What are the four pace modes?
A coaching framework, not a search term: M1 survival (roughly 80–85% of your pace, for turn one and chaos), M2 management (85–90%, slower on purpose for fuel, tyres or a gap), M3 race pace (90–95%, repeatable but on edge) and M4 maximum (95–100%, everything you have). Every percentage is of your own maximum, not the leader's. The four modes.
Why can't you drive at 100% for the whole race?
Arithmetic. If maximum pace is worth three tenths a lap and you hold it for two laps, you have gained six tenths; one mistake at eight tenths puts you behind where you started. Concentration lapses are close to inevitable at the limit, so the target is maximum average pace, not maximum pace. The risk-reward maths.
Does starting position change how you should manage your pace?
Yes, more than anything else. From the front, staying cautious costs the most because there is nothing in front of you and the gap is yours to build. Mid-pack is the hardest place, with cars that genuinely have your pace on both sides. From the back you can afford a longer survival phase, but a twenty-minute race does not leave time to recover it if it goes on too long. Survival itself is mandatory everywhere. The three cases.
How do you practise being fast on cold tyres?
Ten minutes of one practice session: one clean lap to bring the tyres to roughly race-start temperature, one lap driven as if it were lap one of the race, reset to pits, repeat five times, then compare them. Pushing straight out of the pit box rehearses colder conditions than a race start, so the warm-up lap is part of the drill. The cold-tyre reset.
How do you measure race pace?
Break the stint into four numbers rather than reading the fastest lap: clean-lap pace (the average of laps with no mistake, traffic or start in them), the variation between those clean laps, the trend across the stint, and the time lost to the opening laps, mistakes and traffic. Track clean-lap pace and opening-lap loss on the same track across races, and only compare laps at similar fuel, tyre state and conditions. A worked stint example.
Why does my pace drop later in the race?
Usually tyres or concentration rather than fuel load: in most cars fuel burn alone would make the later laps slightly quicker. Compare clean laps from the first and second half of the stint; if they fade, check tyre temperature and wear, and drop to race pace when you notice your concentration slipping rather than after the mistake. Holding pace later in the stint.
This guide is part of the free library at GitGud Racing Academy — an online sim racing academy built around weekly lap reviews, structured courses, drills and training tools.
Train this the right way
Reading is step one. Build it into muscle memory with structured, car-specific courses and personal lap reviews from a coach — inside the Academy.
Join the Academy · $39.99/mo incl. VAT